Mamaleh on Christmas

So rather than opt for the tradition of our people to indulge in Chinese food on Christmas day, we had a lovely invite to Christmas dinner at the home of some dear friends.  Other than wine, in true Mamaleh fashion, I offered to bring challah.  I thought it’d be fun to give it a truly Christmas twist and make it into a candy cane.  I figured it would need to be a four strand for even coloring but wasn’t quite sure how to get stripes as opposed to just alternating colors.  My husband suggested doing a mock-up with string so I grabbed some pipe cleaners – they lend themselves to shaping a bit better than string. It all comes down to the order you start the braids.  I first tried alternating colors and that did not work at all.  Then I discovered that if you arrange the colors 2 and 2 and then follow the 4-strand braiding technique by The Challah Blog, you will get just the right stripes.

Continue reading

Matzo Roca! Matzo Like You’ve Never Had It Before!


MatzoRocaBoxWM

Chag Sameach!  Are you sick of matzo yet?  Well I have the answer…Matzo Roca! This stuff is so delish that I literally have non-MOT friends awaiting it every year when Passover rolls around.  I just whipped up my second batch this week. And best of all, it’s super easy! It’s one of my all time favorite recipes courtesy of my friend Renée.

Continue reading

A Harvey Wallbanger Shabbat

Harvey Wallbanger Cake Star of David Bundt

Ever heard of a Harvey Wallbanger?  I hadn’t either until I was introduced to a recipe by way of my brother’s mother-in-law (Thanks Jane!).  But apparently it was a very popular drink in the 70s which would explain why I’ve never actually imbibed one myself seeing as how I wasn’t born until 1978.  Though I won’t be ordering one at the bar anytime soon (I prefer a good Cosmo), I am here to tell you that it lends itself to the most amazing bundt cake you have ever had. Continue reading

Challah at its eggiest (aka its best)!

Last year I introduced you to my go-to challah recipe. Well, I still like that one just fine but truth be told I have a new favorite. If you own any Jewish cookbooks, chances are at least one of them was written by the amazing Joan Nathan.  (Pretend you are watching me bow down here because there really are no words for me to describe how amazing Joan Nathan is when it comes to the Jewish kitchen).  Not only are her cookbooks full of delicious recipes and beautifully written but they are chock full of history as well.  My favorite book, probably because it speaks to the American Studies major in me, is Jewish Cooking in America. But the book that is home to my new favorite challah recipe is The Foods of Israel Today which makes my mouth water thinking of all the yummy foods my husband and I tried on our Birthright trip in 2005.  The “Beigel Family Challah” really showcases the farm fresh eggs we get each week from my friend Andie’s Farm.  After all, the recipe uses a total of 5 eggs –  just look at that gorgeous yellow hue!  Mmmm…eggy goodness!

Challah Recipe from Joan Nathan's The Foods of Israel Today

Thanks to the folks at Knopf for allowing me to share the recipe with you in full!  My one suggestion is to brush on a little bit of honey after the final egg wash – personally, I prefer this little added sweetness to seeds.  And, if you are like me and need visual directions, turn to the The Challah Blog for easy to follow braiding tutorials– the challahs pictured above were six strand loaves for a baby naming this past weekend.  Enjoy!

Beigel Family Challah

Excerpted from Joan Nathan’s  THE FOODS OF ISRAEL TODAY (Knopf)

Yield: 2 CHALLAHS

1 ½ packages dry yeast ( 1½ scant tablespoons)

5 large eggs

1 tablespoon plus ½ cup sugar

1 tablespoon salt

1 ¾ cups lukewarm water

8-8½ cups all-purpose flour

½ cup vegetable oil

Poppy or sesame seeds for sprinkling

  1. In a large bowl, dissolve the yeast and 1 tablespoon of the sugar in the water
  2. Whisk the oil into the yeast, then beat in 4 of the eggs, 1 at a time, with the remaining sugar and salt.  Gradually add 8 cups of the flour.  When the dough holds together, it is ready for kneading.  (You can also use a mixer with a dough hook both for the mixing and the kneading).
  3. Turn the dough onto a floured surface and knead until smooth.  Clean out the bowl and grease it, then return the dough to the bowl.  Cover with plastic wrap and let the dough rise in warm place for 1 hour, until almost doubled in bulk.  The dough may also rise in an oven that has been warmed to 150 degrees and then turned off.  Punch down the dough, cover, and let rise again in a warm place for another half hour.
  4. To make a 6-braided challah, take half the dough and divide into 6 balls.  Roll each ball with your hands into a strand about 12 inches long and 1 ½ inches wide.  Pinch the strands together at 1 end, then gently spread them apart.  Move the outside right strand over 2 strands.  Then take the second strand from the left and move it to the far right.  Regroup to 3 on each side.  Take the outside left strand and move it over 2 to the middle, then move the second strand from the right over to the far left.  Regroup and start over with the outside right strand.  Continue this method until all the strands are braided, tucking the ends underneath the loaf.  They key is to always have 3 strands on each side so you can keep your braid balanced.  Make a second loaf the same way.  Place the braided loaves in greased 10-by-4-inch loaf pans or on a greased cookie sheet with at least 2 inches in between.
  5. Beat the remaining egg and brush it on the loaves.  Let loaves rise another hour.
  6. Preheat the oven to 375 degrees and brush the loaves with egg again.  Sprinkle on poppy or sesame seeds.
  7. Bake for 35 to 40 minutes or until golden and loaves sound hollow.  Cool the loaves on a rack.

8/8/13 Update: If you copied the recipe when originally posted, please note that a line regarding the proper rise time for the first rise was cut off.  The recipe has now been updated with the complete directions.  I apologize for any confusion. Mamaleh

A Very Jewish Summer Day 5: Ceviche and Champagne from Israel

What a fun week it’s been! It’s finally here, day 5 and we have a post from BisStyle, all the way from Israel.  It’s a lovely recipe of Ceviche and Champagne.  If, like me, you can’t read Hebrew, you’ll need a little help from Google translate but it sure does look refreshing and summery!  If only it weren’t raining in Seattle!

It’s been a super fun week full of fantastic summer inspiration.  Many many thanks to Dena at Chai & Home for putting together such a great week of emerging Jewish bloggers!  Here’s a recap of the week in case you missed anything:

Monday: Evoking Childhood Shabbat Memories on YentaMamas
Tuesday: Shabbat Style: Alfresco Orange Tablescape on Chai&Home
Wednesday: Summer Camp Care Packages on MadeByMamaleh                                                                                         Thursday: Portobello Burgers by Busy in Brooklyn

Hope you’ve enjoyed it as much as all of us did!  Shabbat Shalom!

A Very Jewish Summer Day 4: Grilled Goodness from Busy in Brooklyn

Welcome to a A Very Jewish Summer Day 4! Hope you enjoyed my post yesterday on creating a camp care package with love.  Today, we are joined by Chanie from Busy in Brooklyn where you’ll find lots of great recipes and other ideas! Chanie has a found a way to make a kosher “cheeseburger” by creating a lovely looking Portobello Burger with Sundried Tomato Aioli.  It’d be the perfect meal to serve for your Shabbat Alfresco.  Now truth be told, I don’t like mushrooms.  It’s just a thing.  I can’t help it but I must confess, this looks so good, I might just have to give to give it a try!  I am sure my husband would totally love this!

So, go check it out and get grilling!  If you missed this week’s earlier posts, here is a quick recap:

Monday: Evoking Childhood Shabbat Memories on YentaMamas
Tuesday: Shabbat Style: Alfresco Orange Tablescape on Chai&Home
Wednesday: Summer Camp Care Packages on MadeByMamaleh

Stay tuned tomorrow for the final installment of this blogging party, all the way from Israel (so get your Google translator ready!)

Challah from a mix??

In the past year, I have fully embraced baking my own challah. There is absolutely no comparison to warm, homemade challah, fresh from the oven so we haven’t had store-bought challah in our house for quite a while. My current favorite recipe (the Beigel Family Challah from Joan Nathan’s The Foods of Israel Today) goes through three rises and it’s not a short endeavor. So, I was really excited and curious when my sister-in-law (of the awesome site Mock-Off) said she’d read about a company that had developed challah mixes.

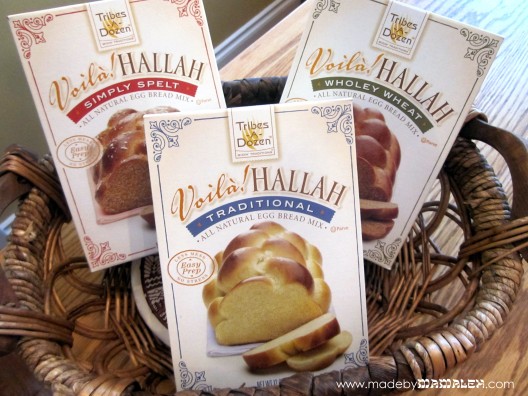
But could challah from a mix really be as good as from-scratch? I contacted them to see if they’d be willing to send me some mixes to try out and share with you. Tribes-A-Dozen‘s clever motto is “Break bread, not tradition.” The whole idea is that by using the Voila! Hallah mixes, you can make a traditional challah in under two hours.  I love the idea of making it more accessible to the modern family! They offer three varieties: Traditional, Wholey Wheat and Spelt, all available on Amazon and some East Coast supermarkets.

Challah mixes

Definitely an “A” for packaging; I think the cute boxes would be great for gift baskets. Inside, the boxes include a yeast packet and mix while the back of the box has detailed instructions. I decided to start with the Traditional. For this one, you need eggs, oil, and, water. Sesame or poppy seeds (for the top) and sugar (for the egg wash) are optional. The preferred method for mixing is with a stand mixer although it does say it can be done with a bread machine or by hand. My Kitchen-Aid is my challah making friend for sure! After following the mixing directions, the dough appeared as in photo 2 below. It was definitely much stickier than my go-to challah recipe. The first rise is only 10 minutes and it did not rise all that much. After the 10 minute rise, I braided the challah and applied the egg wash (which I did add a little sugar to). It was definitely much stickier dough than I am used to working with but I didn’t have any trouble rolling it out on my silicone mat.

Tribes-A-Dozen Traditional Hallah

After 45 minutes of rising on the parchment-lined baking sheet (again little visible size increase), it then baked for about 25 minutes and came out this lovely golden color (picture 4 sitting atop my awesome bread warmer stone). I do have to say that he beautiful color is thanks in part to the yummy farm fresh eggs from my friend Andie’s Farm. Now that we’ve switched to farm fresh eggs, we won’t go back. The difference is amazing. Andie’s even done a comparison on her blog if you need further evidence of the merits of farm fresh.

As the Traditional was rising/baking, I set to work on the Wholey Wheat and Spelt. Both call for the same additional ingredients as the Traditional along with some honey. The directions vary from the Traditional and call for longer rise times, so be sure to follow them carefully.

Wheat & Spelt Hallah Mixes by Tribes-a-Dozen

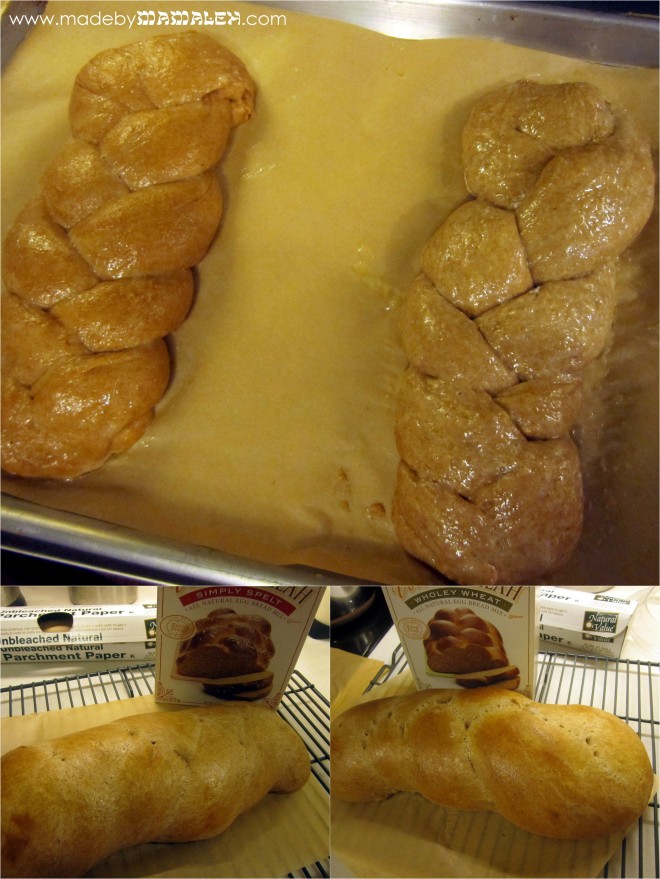
Even after the longer rise, both were quite sticky but again manageable on the silicone mat with some flour for forming the loaves. Now I’m not sure if I didn’t braid them tightly enough or what but as you can see in the photos below, the braids lost their definition after baking. I looked through the tips on Tribes-A-Dozen’s page and couldn’t find anything that might explain this.

Spelt and Wheat Challahs

Here are all three nice and toasty in the bread basket with my warming stone:

Tribes-A-Dozen Challahs

I’d note that each box says it makes one large or two small loaves or 8 rolls. My experience was more like 1 medium loaf per box (at least in comparison to the recipe I usually use which makes three small loaves). With the rising and baking all done, it was time for the biggest test of all: TASTE. Here are all three sliced:

Tribes-A-Dozen Hallahs from mix

They were all good but definitely not as good as scratch. I told my husband and our friends doing the taste testing (on Christmas of course!) that the comparison should be whether they are better than store-bought. The consensus was they are better than your average grocery store challah but probably not better than a decent bakery. The texture on the Traditional just wasn’t quite what I’d hoped for and look for in a challah. Although you do get the added benefit of getting them warm from the oven which is a big plus. The stand-out was the Wholey Wheat, which despite it’s undefined braids, had a really yummy wheat flavor and great texture – much better than the whole wheat challahs I’ve made before. So, if you are not a challah purist, I think the wheat is definitely worth a try. As for the others, I’m on the fence. I think that if you are new to baking bread and/or challah, they are a good way to ease in on a smaller scale. They also do simplify the process and shorten it time-wise which is a selling point too. Like I mentioned before, I also think they’d be sweet in a housewarming gift basket along with some dish towels and measuring cups or other kitchen essentials.

What do you think?  Would you try challah from a mix?

HAPPY NEW YEAR! L’Chaim!

P.S. In case you missed the post on Facebook, Heidi was the winner of the Michael’s gift card.  Remember to follow Mamaleh on FB for more fun posts and tips in between blog updates.  Just be sure to click show in News Feed under the like button so that you don’t miss any posts.

Note: I was not financially compensated for this post. I received Tribes-A-Dozen mixes  free for review purposes. The opinions are completely my own based on my experience.

Best Honey Cake Ever!

Eastern European Honey Cake with Lemon Sugar Glaze

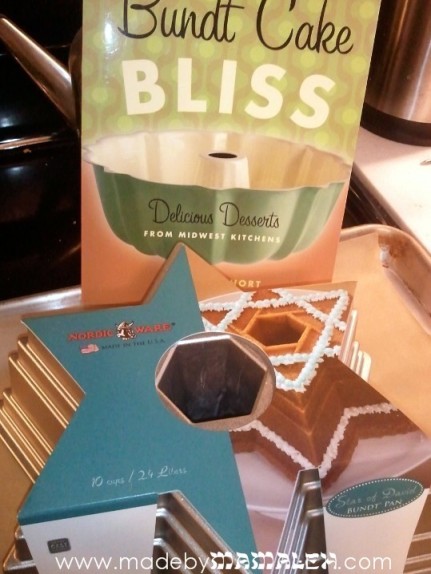
Some of you saw my honey cake on Facebook and asked about the pan and the recipe…So, truth be told, I have never been a huge fan of honey cake.  The ones I’ve had have always seemed a bit dry or too sweet.  Well, the recipe I tried yesterday from my Bundt Cake Bliss cookbook has made me a convert!  In general, I love a good Bundt cake – it comes out perfectly formed and gorgeous (assuming proper pan prep).  I couldn’t resist the opportunity to add a Jewish Star of David Bundt Pan to my collection, especially since it’s made by Nordic Ware, the best in the biz.  Just FYI, this particular pan holds 10 cups and the recipe calls for a 12 cup, it means that the bottom of the cake will be a bit rounded but that was a non-issue really.

Jewish Bundt Pan and Bundt cookbook

Other than giving it my own Jewish twist thanks to the pan, I highly recommend using really good honey – I used my favorite Pacific Northwest Blackberry.  Mmmmm!  I also opted for golden raisins for the look.  Oh and the author’s recommendation to pair it with some Humboldt fog cheese is simply the best thing ever.  I highly recommend trying  it, especially for a brunch.  The combo is simply divine. So, whether you tuck it away for next Rosh Hashanah, make it for your Yom Kippur break-the-fast or just give it a go whenever, thanks to the lovely folks at the Minnesota Historical Society Press (aka the publisher), I get to share this delicious recipe with all of you!  Enjoy!

Eastern European Honey Cake with Lemon Sugar Glaze

Reprinted from Bundt Cake Bliss by Susanna Short with permission of the MHS Press

SERVES 10 to 12

CAKE              

3 cups flour

1 ½ teaspoons baking powder

1 teaspoon baking soda

½ teaspoon salt

1 teaspoon cinnamon

½ teaspoon ginger

½ teaspoon nutmeg or mace

2 teaspoons instant coffee or espresso powder

1 cup sugar

1 cup honey

½ cup vegetable oil

4 eggs

1 tablespoon finely grated lemon peel

3 tablespoons of lemon juice

2 tablespoons brandy

2/3 cup cold water

¾ cup chopped walnuts

½ cup raisins

GLAZE

¾ cup sugar

1/3 cup fresh lemon juice

Preheat oven to 350°F.  Prepare a 12-cup Bundt pan using butter and flour or Baker’s Joy and set aside.

Combine dry ingredients and set aside.  Beat sugar, honey, oil, eggs, lemon peel, lemon juice and brandy in large bowl on medium for 2 minutes.  Alternately add the flour mixture and the water to the honey mixture, mixing thoroughly between additions.  Beat for 2 minutes at high speed.  Fold in the nuts and raisins.  Pour into the prepared pan.

Bake for 1 hour to 1 hour 10 minutes, or until a toothpick comes out of the cake clean.  Let cool in pan for 10 minutes, and then turn onto a serving plate.

To prepare the Lemon Sugar glaze, mix ¾ cup of sugar with 1/3 cup fresh lemon juice.  Place in saucepan and heat until sugar dissolves and the mixture is slightly thickened.  Prick top of cake gently with a fork and drizzle with glaze, allowing it to soak in before adding more.

I like to serve this with nuts scattered on the platter.  It also looks elegant as a composed dessert with thinly sliced fresh figs and pears fanned around the cake.  Or try this with a soft cheese like Humboldt Fog, drunken goat, or sharp brie.  The blending of the savory and sweet with a cup of espresso is a very graceful ending to a formal dinner party.

Challaaaaaahhhh!

Honey Glaze Challah

Until this year, I’d never made challah before. Of course I love to eat it but the thought of making it totally intimidated me (probably because I remember one attempt by my mom when I was a kid did not resemble challah at all, sorry, mom). In an attempt to cook more and put my cookbook library to good use, I challenged myself at the beginning of the year to try one new recipe a week. For the most part I’ve kept up with the challenge, some weeks cooking less and some more.  But, what I’ve found is that trying different challah recipes has played a big role in the challenge and I’ve figured out that making challah really isn’t so scary and actually the process is rather therapeutic after a hectic week.

As I mentioned the other week, I love The Challah Blog as it has lots of fun innovative challah ideas and fantastic tutorials for braiding. But, so far my go-to challah recipe has been derived from Tante B’s “Famous Challah.” I’ve made my own addition to the glaze and also simplified her process since I am lazy efficient and like to rely heavily on my trusty Kitchen-Aid. In fact my Kitchen-Aid has gotten such a workout since the beginning of the year that my husband had to replace the grease inside (that has made it work even better and at some point, I’d be happy to share how he did it).

This recipe has worked really well every time I’ve made it at home (Seattle).  But, I even tried it in the desert (Las Vegas) where I was told bread just doesn’t rise right and it turned out great.  It’s not very eggy as far as challah goes but it is quite delicious, especially with the hint of honey on top.  So, if the idea of making your own challah scares you, I promise, it’s a lot easier than it looks so give it a try one of these days.  Happy baking!

Ingredients for 2 large challot:

7 cups of all-purpose flour
2 packages or 4 ½ teaspoon of dry yeast
2 eggs (1 for dough, 1 for glaze)
½ cup vegetable oil
1 Tablespoon salt
½ cup sugar
2 cups warm water
Honey to taste (for glaze – I love the specialty NW honeys available like blackberry)
PAM or extra vegetable oil (for bowl)

Directions:

1.  In bowl of stand-mixer combine 1 Tablespoon sugar (removed from the ½ cup), 2 cups warm water and yeast.Let sit for roughly 10 minutes until the yeast has dissolved and is foamy. It should go from the top picture to the bottom in about 10 minutes.

Challah

2.    Once yeast is nice and foamy, add the remaining sugar, salt and 3 ½ cups of flour.  Mix using the bread hook.

Kitchen Aid Mixer challah

3.    Add egg and oil.  Mix.

4.    Add remaining 3 ½ cups of flour slowly and mix using bread hook.You may need to scrape the dough off the hook several times and put it back in the bowl. Keep mixing until the dough has formed a nice ball and springs back when pressed with your finger.  If for some reason, it’s still too sticky, add a little flour.

5.    Spray a bowl with PAM (you can also swirl veggie oil on the sides but I find PAM oh so easy) and put the dough in the bowl. Cover with Saran wrap and a dish towel and put somewhere warm to rise. If it’s cold out you can turn your oven on to 150 and then turn it off and put the bowl in there to rise. The dough will look like the picture on the top. After an hour (or more), it should look like the photo on the bottom.

Challah

6.     When the dough has risen, give it a good punch down with your fists and then put it back to rise some more. Depending on how rough a week I’ve had, I may give it a second punch down but I haven’t found this critical in making this recipe work.

7.    After 2 hours, turn dough onto silicone mat to roll out.

8.    I use my hands to split the dough into two even sized balls – one ball for each loaf.  If you want to make three smaller loaves, as I did last week, just split it into three.

9.    Then with each of those balls, portion out the dough according to the number of braids you need. Here, I did 3-strand loaves but there are tons of options out there.

10.  Roll out each little ball on the silicone mat being sure to work out any air pockets and then braid directly on baking sheet covered in either parchment or silicone baking mat using whatever braiding style you prefer. (I recently upgraded to an extra-large baking sheet that takes up my whole oven that can hold 2 large or 3 small loaves. Now I just need to find the right size silicone baking mat for it!)

11.  Once the loaves are braided, cover them with a dish towel and let rise for 30 minutes.

12.  Preheat oven to 375°F.

13.  After allowing loaves to rise, beat remaining egg in bowl.  Using silicone pastry brush, lightly brush over each challah. Then drizzle honey on top, to taste and also brush on using same silicone brush.
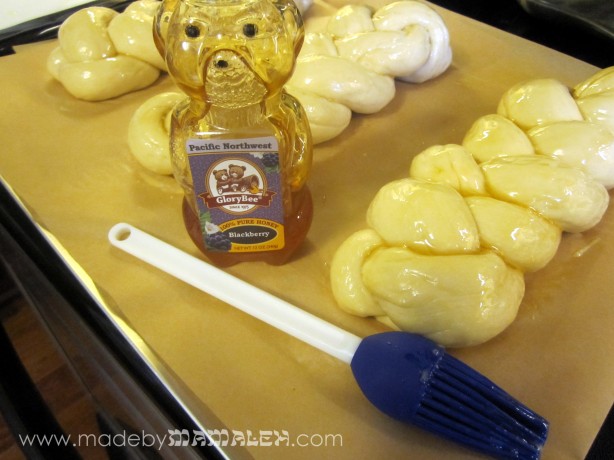
Challah honey glaze with pacific northwest blackberry honey

14.  Bake for 25 minutes. Then, turn off oven allow the challah to sit in the oven for another 10 minutes.

15.  Remove and allow to cool on rack.  Enjoy!

challah

Winner, winner, Shabbat dinner!

As I write this, the most delicious smell is wafting from my kitchen and I only hope the result will taste as good as it smells!  I have been home all day with a sick bubelah so decided it was a challah-baking kind of day.  But, rather than go with my fav traditional recipe (which I’ll share with you another time), I decided to go with one from one of my favorite Jewish cooking blogs: The Challah Blog.  I mean what is there not to like about challah, but Amanda over at The Challah Blog takes it one step further with all kinds of fun kinds and shapes (great tutorials in this regard – it is now my go-to braiding reference).  A while ago, she posted about a maple syrup challah  that sounded divine.

A few preliminary thoughts: 1) I used the maple syrup cold from the fridge (since we always have it on hand) and my yeast did not foam up as much as usual so I wonder if perhaps this would work better at room temp; and 2) I am used to a recipe that makes two BIG loaves of challah which this didn’t.  It made two lovely smaller loaves (which is probably just as well for our waistlines).

Mmmmm….I just had a bite and it is delish and has a really nice texture.  I took Amanda’s advice and sprinkled cinnamon on one but I agree, I want even more of the maple sweetness.  I wonder how to achieve that?

Finally, we have a winner from our little Earth Day giveway, using a random number generator for a number between 1 and 8, I got #3: KaraAnne Grodin!  Shabbat shalom to all!  I’m off to have some wine and challah 😉