Fit for a Princess!

And the Wine Charm Giveaway Winner!

We had another 3rd birthday party to go to this past weekend, a princess themed one to be exact.  So, I thought I’d use it as a chance to have a little more fun with T-shirt vinyl and rhinestones and make the birthday girl her own, very personalized tee.

I started with a cute girls’ tee from Old Navy – I’d show it to you but it’s not on their website anymore – why are plain kids’ tees so hard to find?!  Then, I used the rhinestone template I created when working on my Queen Farmer Hat.  Well, to be precise, I used the first template I created that was too big for the hat 🙂

Silhouette rhinestone remplate

I wanted to jazz it up a bit more so I free-handed a heart in the center and later aded pink jewels to the points.

Princess crown iron on

Next I cut the word “Princess” out of pink glitter heat transfer using Silhouette Studio and the font Lavanderia Sturdy.  I went with the lighter Lavanderia Regular and Lilac vinyl for the princess’ name.  Then, I laid everything out on the shirt using a clear ruler to get things just so.

Then I carefully ironed each piece on one at a time, finishing with the crown so it would sit on top of the words in a few spots.  The final result was just as I’d hoped it would be – fit for a princess!

And finally, the winner of the Shabbat Wine Charm giveaway is…Tina David Konegan!  Mazel tov Tina!  Email me your address so I can get your prize in the mail!

Not Your Bubbe’s Hebrew {Font}!

Oh, I am so excited about this project I can hardly type!  So, as you may have all figured out by now, I am totally in love with my Silhouette Cameo.  It cuts paper and vinyl and fabric (though I haven’t tried that one yet) and best of all, it cuts any font!  I knew even before I ordered it that I one of the things I wanted to be able to do try with it was cut Hebrew letters.  Just think, the possibilities for Judaica projects or even every day projects with a jew-ish flare are endless!  Here’s a little preview:

Hebrew name on t shirt

Silhouette Studio is the software that comes with the Silhouette that you can use to create whatever you are cutting.  The tricky part is that it only supports English.  So, here’s how to get cool Hebrew letters into Silhouette Studio (using Windows, sorry Mac folks) and cut out:

First of all, you may not know it, but many fonts you already own often contain Hebrew letters but using them can be a bit tricky since you aren’t sure where to find them, etc.  So, my first recommendation is that you install the Hebrew keyboard in windows so that you can easily access the letters.  This is really easy – here is a guide to adding input languages.  I also recommend selecting that the language bar be docked in the taskbar so you can easily switch between languages when you are working.  If you really want to make things easier on yourself, you can order some of these hebrew keyboard labels to doctor up your keyboard.

Then, open up a document in Microsoft Word, switch to Hebrew on your language bar and start typing.  I am working on a gift for a friend who’s daughter’s Hebrew name is Morasha.  Here you can see how it looks in several different fonts in Word.  Remember, just like English, Hebrew comes in both block and script fonts.  The standard ones that you probably have already, like Times, are pretty traditional (think prayerbook) Hebrew letters but there are some beautiful scripts out there that are really modern and chic.  Here’s a good list.  Of course, with these you can do all sorts of fun stuff using Word or whatever program you like!

Once you have your word or sentiment typed in Word, you’ll want to copy the word and then paste it into a blank Silhouette Studio document.  When you first paste it, it will appear backwards like it is in this picture.

Pasting Hebrew Letters into Silhouette Studio

So, you’ll want to right-click and then select “Flip Horizontally” so that you can see what it looks like and play around with the fonts.  The Hebrew fonts will show up on your font list in  Silhouette Studio even though you can’t type in Hebrew in the program.  I just love this “Dybbuk” font so after the flipping my word, I then selected a different font, sized it a bit and viola!
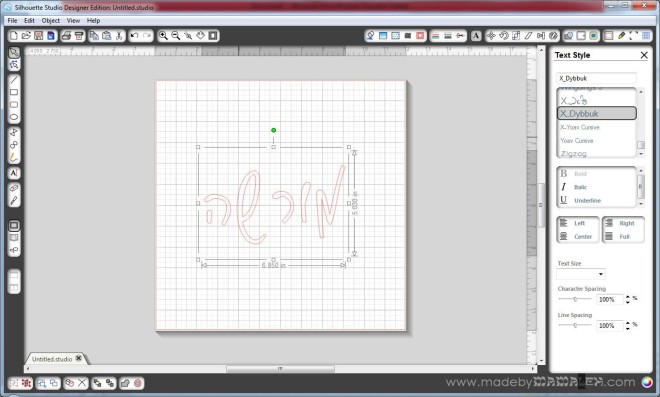
Hebrew Font in Silhouette Studio

Now, since I am going to put this on a T-shirt, I will need to flip this again horizontally for cutting out of heat transfer so that it will be in the right direction when I iron it on.  Don’t forget this step – I did the first time and cut it out in the wrong direction for ironing so sadly wasted some heat transfer material.  For this project, I used the Silhouette grey flocked heat transfer.  It looked great on the pink T!

But it would have been too plain to just have her Hebrew name all by itself, I needed to add some bling.  So, using a combo of rhinestones from my Silhouette kit, I created a lovely rhinestone butterfly for Miss M!

Iron-on Rhinestone Butterfly

The final product – a totally personalized Hebrew name T!  Perhaps we’ll be lucky and Miss M will even model it for us!

Hebrew name tee with rhinestone butterfly

Now that I know I can cut out Hebrew letters, what else should I make??  Any ideas?  Ooh, so many possibilities…

A Very Toddler Passover!


Since I am home with a sick boy, I thought I’d take the opportunity for a little Passover follow-up. The Passover story we tell every year is such a rich one but it often gets lost amidst hunger and outdated haggadot. This year our 2nd night seder was tailored specifically to our youngest guests – a group of toddlers from our PEPS group (if you aren’t in Seattle, PEPS stands for Program for Early Parent Support).

Using the URJ’s seder for toddlers age 2-3 as a template, I copied the content and added my own into an easy to hold program just for the adults using MS Publisher.  I even pre-assigned the sections to help expedite things! The content was written for kids and they really did a good job of following along and paying attention.

In addition to this, I pre-downloaded this song about the 10 plagues which we played at the appropriate part of the seder and which was a big hit with the kids.  Since a group of toddlers is very into numbers and colors, this was the focus for our seder table.  For the 4 cups of wine, I used clear plastic shot glasses (a novel use for these I am sure) and used the print and cut feature on my die-cut machine and clear label paper to create numbered toddler-size cups for each of the four glasses.  I also created plague bags with a  label with the numbers 1-10.

Placemats were made using primary colors of scrapbook paper which made for not only easy cleanup but easy personalization, with each child’s name written across the bottom.  The dishes were ones I had picked up at Target a couple years ago on sale – I love them!  Each kid got a toy hammer for pretending to hammer along with one of the songs.  Such fun!

The plague bags themselves were filled with stuff to go along with the song.  You’ll note the “blood” confetti above that I made using red cardstock and my die-cut machine and a raindrop image.  Even my husband was surprised when we sang about the blood and I suddenly tossed a handful of confetti at the kids.  The bags themselves contained a little shaker of confetti (hail), sunglasses (darkness), wind-up flying bug (lice), flies (flies)sticky frogs (frogs) and a band-aid (boils).  We didn’t have something for every plague but that was just fine, there was plenty to keep the kids engaged and involved in the seder.  Oh and one other tip, little bowls of cucumbers and carrots (karpas) for the kids to dip as necessary before it’s time for the actual meal.

Overall, it all turned out really well.  My husband said it was the best seder he’s ever been to!  I can’t wait to do a new variation next year!  Hope you all had a lovely Pesach!