A touch of Hiddur Mitzvah

[Disclosure: This post contains some Amazon affiliate links for certain items.]

I am back!  Well truly I haven’t gone anywhere but I have been far too busy mamaleh-ing to be blogging. That’s just the truth. I craft and create but adding the layer of writing and photographing (especially in the mess that is my craftroom) has just exceeded my daily allotment of quiet hours. Two year olds are busy bees and they want to do whatever mom is doing!  So, it’s currently nap time in my house, or rather was until a minute ago, and I have a few minutes to share a simple and sweet creation with you.

Continue reading

A Harvey Wallbanger Shabbat

Harvey Wallbanger Cake Star of David Bundt

Ever heard of a Harvey Wallbanger?  I hadn’t either until I was introduced to a recipe by way of my brother’s mother-in-law (Thanks Jane!).  But apparently it was a very popular drink in the 70s which would explain why I’ve never actually imbibed one myself seeing as how I wasn’t born until 1978.  Though I won’t be ordering one at the bar anytime soon (I prefer a good Cosmo), I am here to tell you that it lends itself to the most amazing bundt cake you have ever had. Continue reading

Challah at its eggiest (aka its best)!

Last year I introduced you to my go-to challah recipe. Well, I still like that one just fine but truth be told I have a new favorite. If you own any Jewish cookbooks, chances are at least one of them was written by the amazing Joan Nathan.  (Pretend you are watching me bow down here because there really are no words for me to describe how amazing Joan Nathan is when it comes to the Jewish kitchen).  Not only are her cookbooks full of delicious recipes and beautifully written but they are chock full of history as well.  My favorite book, probably because it speaks to the American Studies major in me, is Jewish Cooking in America. But the book that is home to my new favorite challah recipe is The Foods of Israel Today which makes my mouth water thinking of all the yummy foods my husband and I tried on our Birthright trip in 2005.  The “Beigel Family Challah” really showcases the farm fresh eggs we get each week from my friend Andie’s Farm.  After all, the recipe uses a total of 5 eggs –  just look at that gorgeous yellow hue!  Mmmm…eggy goodness!

Challah Recipe from Joan Nathan's The Foods of Israel Today

Thanks to the folks at Knopf for allowing me to share the recipe with you in full!  My one suggestion is to brush on a little bit of honey after the final egg wash – personally, I prefer this little added sweetness to seeds.  And, if you are like me and need visual directions, turn to the The Challah Blog for easy to follow braiding tutorials– the challahs pictured above were six strand loaves for a baby naming this past weekend.  Enjoy!

Beigel Family Challah

Excerpted from Joan Nathan’s  THE FOODS OF ISRAEL TODAY (Knopf)

Yield: 2 CHALLAHS

1 ½ packages dry yeast ( 1½ scant tablespoons)

5 large eggs

1 tablespoon plus ½ cup sugar

1 tablespoon salt

1 ¾ cups lukewarm water

8-8½ cups all-purpose flour

½ cup vegetable oil

Poppy or sesame seeds for sprinkling

  1. In a large bowl, dissolve the yeast and 1 tablespoon of the sugar in the water
  2. Whisk the oil into the yeast, then beat in 4 of the eggs, 1 at a time, with the remaining sugar and salt.  Gradually add 8 cups of the flour.  When the dough holds together, it is ready for kneading.  (You can also use a mixer with a dough hook both for the mixing and the kneading).
  3. Turn the dough onto a floured surface and knead until smooth.  Clean out the bowl and grease it, then return the dough to the bowl.  Cover with plastic wrap and let the dough rise in warm place for 1 hour, until almost doubled in bulk.  The dough may also rise in an oven that has been warmed to 150 degrees and then turned off.  Punch down the dough, cover, and let rise again in a warm place for another half hour.
  4. To make a 6-braided challah, take half the dough and divide into 6 balls.  Roll each ball with your hands into a strand about 12 inches long and 1 ½ inches wide.  Pinch the strands together at 1 end, then gently spread them apart.  Move the outside right strand over 2 strands.  Then take the second strand from the left and move it to the far right.  Regroup to 3 on each side.  Take the outside left strand and move it over 2 to the middle, then move the second strand from the right over to the far left.  Regroup and start over with the outside right strand.  Continue this method until all the strands are braided, tucking the ends underneath the loaf.  They key is to always have 3 strands on each side so you can keep your braid balanced.  Make a second loaf the same way.  Place the braided loaves in greased 10-by-4-inch loaf pans or on a greased cookie sheet with at least 2 inches in between.
  5. Beat the remaining egg and brush it on the loaves.  Let loaves rise another hour.
  6. Preheat the oven to 375 degrees and brush the loaves with egg again.  Sprinkle on poppy or sesame seeds.
  7. Bake for 35 to 40 minutes or until golden and loaves sound hollow.  Cool the loaves on a rack.

8/8/13 Update: If you copied the recipe when originally posted, please note that a line regarding the proper rise time for the first rise was cut off.  The recipe has now been updated with the complete directions.  I apologize for any confusion. Mamaleh

A Very Jewish Summer Day 3: Camp Care Packages With Love

Welcome to Day 3 of A Very Jewish Summer! I know for many people summer evokes memories of Jewish summer camp and specifically sleep-away camp, your first adventure away from home.  Growing up in Southern Oregon, I never got to experience Jewish summer camp but having gone to college 3,000 miles from home, I know firsthand how much care packages from home mean.  My little one has a way to go before he heads off to camp by himself (though I am very excited we’ll be heading to Jewish family camp at the end of the summer!).  So, since I have several close friends whose kids will be at camp this year I decided to put together a combo of DIY and store-bought goodies to send them a little love from Mamaleh.

Personalized Camp Stationery

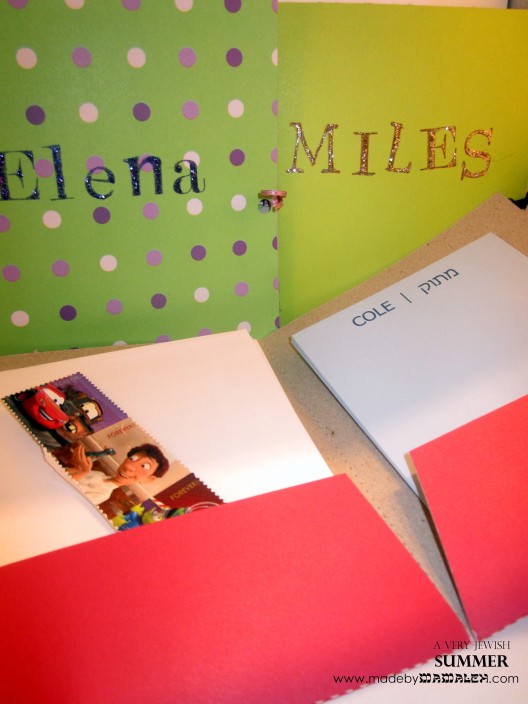
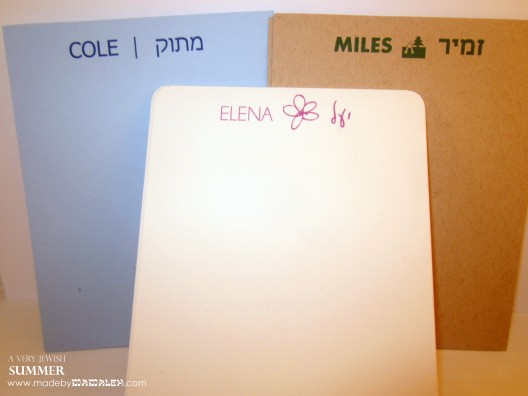
First, a little something to send some love back home (and maybe a thank you note to yours truly) : personalized stationery.  I realize we live in the era of email and text but I think there is nothing better than an old-fashioned letter or card.  I decided to give this a Jewish twist by including both English and Hebrew names on the cards.  Using Microsoft Publisher, I created my own custom A2 size (4.25″x5.5″) template and then created a text block at the top, inserting a little symbol in between the English and Hebrew.  (If you need help using hebrew fonts on your computer, or are looking for some stylish ones, check out my earlier post on the subject.) Then I printed these out on a variety of nice cardstock and cut the cards (by making them A2 size, you get 4 cards per 8 1/2 by 11 sheet of cardstock).  I even rounded the corners on some for a little something extra.

DIY Personalized Stationery

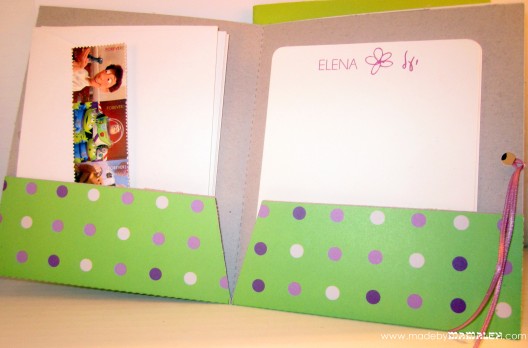
To finish off these sets, I paired them with basic A2 envelopes, cute kid-friendly stamps and matching little folders cut from this folder template using Silhouette Chipboard, layered with cardstock and then stamped and embellished with a little glitter glue.  A tip for the folders – be sure to let the glue set after gluing down the tabs on the sides by putting some pressure on it – I used binder clips which worked really well to hold it in place until it dried.  Last, I punched holes and tied them shut with a little piece of ribbon.

Personalized Stationery Set

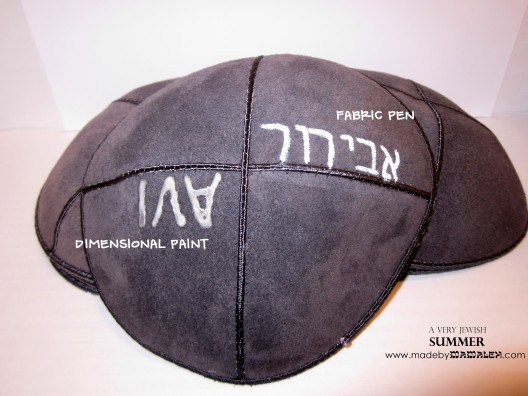
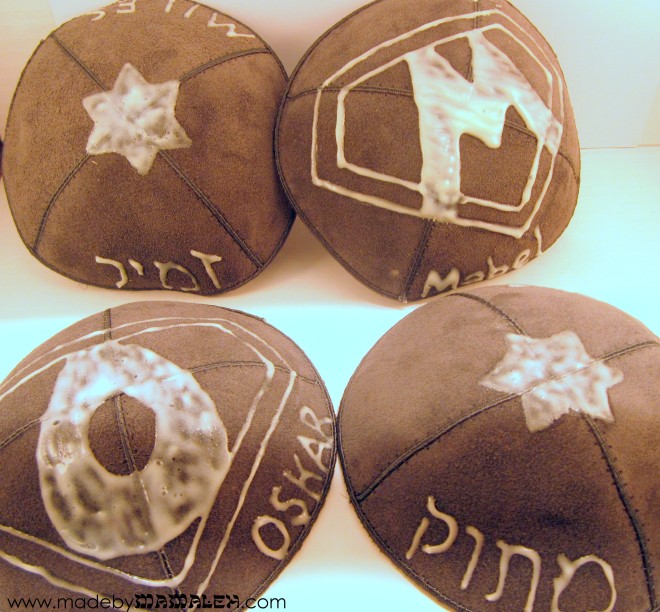
Besides personalized stationery, I had visions of glow-in-the-dark kippahs for Shabbat and Havdallah under the night sky. This proved a bit trickier than I’d envisioned.  I started with some grey suede kippahs from bestkippah.com (I found this was one of the few places that allowed me to order a single dozen versus the several dozen often ordered for weddings and other mitzvahs).  My original plan was to try some glow-in-the-dark heat transfer vinyl  but it wouldn’t stick to the suede so using my Silhouette  for something more intricate was out.

DIY kippah

Next, I tried a glow in the dark fabric marker – it worked on my first test kippah (above) but when I went to try it again the next day, it didn’t want to write on the suede, not exactly sure why, it was almost as if the nap of the suede prevented it from writing properly.  Besides, it didn’t have the same glow factor as my third choice: glow-in-the-dark dimensional fabric paint.  This is a bit tricky to apply because you may get a few bubbles or globs as you are squeezing it but if you go slow, it’s not too bad.  Here are the kippahs I came up with (and yes, one is for a girl, gotta be egalitarian):

DIY glow-in-the-dark kippahs

The result isn’t exactly what I was hoping for but I think it’s still fun and I am planning to go back over some areas to fill them in a bit more.  I know from experience that putting too thick a layer of dimensional paint can prevent it from properly drying so going back over it after it’s completely dry is definitely the way to go.  I also may keep my eye out for other colors of glow-paint to add a touch of color before I send these off.  Most importantly though, they definitely glow in the dark (I tried to get a photo of this but it proved way too difficult), so hopefully they will be a hit with these kiddos!

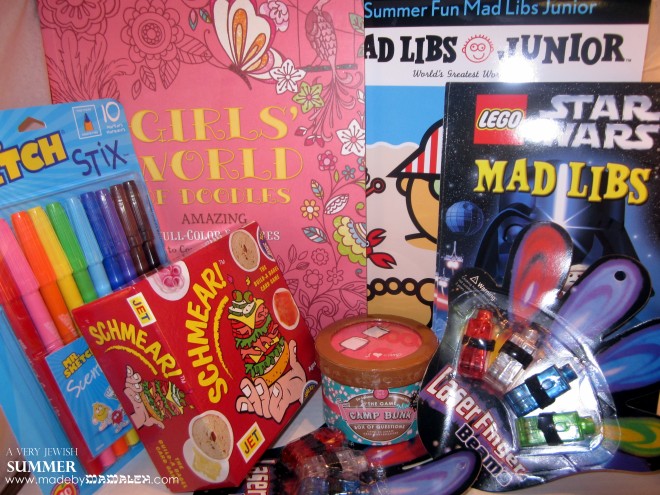
Finally, I did a lot of searching for just the right store-bought additions to these care packages, a little bit of something for everyone:

Camp Care Packages Mini Camp Bunk Box of Questions for some late night chit-chat fun; Girls World of Doodles – I must admit that I kinda wish I could keep this for myself just to spur my own creativity; Mr. Sketch Markers to use for doodling; Finger flashlights for late night reading or silliness, enough to share with the whole cabin; Mad Libs – these were one of my faves on long car trips so I figured they’d be great for camp as well: Lego Star Wars Mad Libs and Summer Fun Mad Libs Junior and finally the yiddish-named build-a-bagel card game Schmear which looks like a lot of fun!

Hope I’ve inspired you to be crafty and creative with your summer camp care packages this year.  If you aren’t feeling crafty or if you’re short on time, you can always opt to send one from somewhere that specializes in camp care packages like The Wrinkled Egg or Sealed With a Kiss.  One final thought, be sure to check what your camp’s care package policies are before sending – most don’t allow food and as a result will open things that are not obvious, hence I am not doing any sort of wrapping.  I can’t wait to pack up all of these goodies and send them off!  What about you? Are you planning on sending any care packages this summer?  What are you including?

That wraps up Day 3 of a A Very Jewish Summer, hope you are enjoying the party so far!  If you are just joining us for this blogging party, be sure to check out what you’ve missed so far –  we started out with the lovely dinosaur cookies by Yenta Mamas for a prehistoric Shabbat treat followed by a lovely Shabbat Alfresco tablescape by Chai & Home and tomorrow we’ll be treated to a yummy recipe from Busy in Brooklyn.  So stay tuned as a Very Jewish Summer continues!

A Very Jewish Summer Day 2: Shabbat Alfresco by Chai& Home

Welcome to Day 2 of A Very Jewish Summer.  Hope you joined us yesterday for Yenta Mamas fabulous dinosaur cookies.

Today, Dena, from Chai & Home, (and the lovely host of this blogging party), has some elegant summer Shabbat style for you.  Chai & Home is a style blog and source book for elegant Jewish living.  There you’ll find lots of inspiration to beautify your observance and really, just day-to-day life.  I love all of the ideas and finds both on the blog and on Chai & Home’s Pinterest boards.

I don’t know about you, but I love having Shabbat dinner on the porch and today’s post from Chai & Home really makes me want to step it up a notch.  So, head on over and check out the lovely Alfresco Orange Shabbat Dena has created.  You’ll be glad you did.  And stay tuned tomorrow for my post featuring (Jewish) Camp Care packages as a A Very Jewish Summer continues!

A Very Jewish Summer Day 1: There’s a…

DINOSAUR!

It’s here!  It may be grey outside in Seattle but A Very Jewish Summer is kicking off today with a super fun post by the fabulous ladies of Yenta Mamas.  I know in our house, the song they reference in today’s post gets lots of air time since my son goes to preschool at the JCC so I absolutely LOVE these cookies, especially the version wearing kippahs!  Check out their blog for “A lot of baking, but mostly a lot of kibitzing” for even more fun ideas.  As a lifelong frosted sugar cookie maker, I adore it!

Stay tuned tomorrow for Chai & Home, followed by moi on Wednesday as I help you put together fun (Jewish) camp care packages as a A Very Jewish Summer continues!

Challah from a mix??

In the past year, I have fully embraced baking my own challah. There is absolutely no comparison to warm, homemade challah, fresh from the oven so we haven’t had store-bought challah in our house for quite a while. My current favorite recipe (the Beigel Family Challah from Joan Nathan’s The Foods of Israel Today) goes through three rises and it’s not a short endeavor. So, I was really excited and curious when my sister-in-law (of the awesome site Mock-Off) said she’d read about a company that had developed challah mixes.

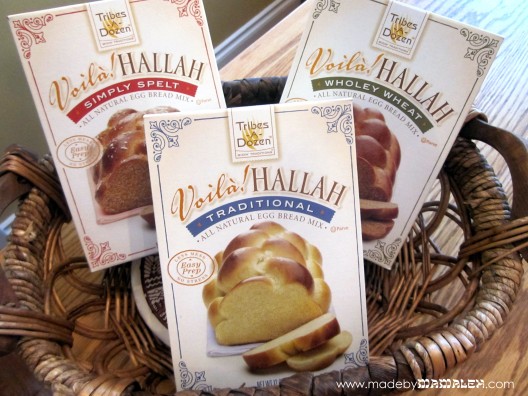
But could challah from a mix really be as good as from-scratch? I contacted them to see if they’d be willing to send me some mixes to try out and share with you. Tribes-A-Dozen‘s clever motto is “Break bread, not tradition.” The whole idea is that by using the Voila! Hallah mixes, you can make a traditional challah in under two hours.  I love the idea of making it more accessible to the modern family! They offer three varieties: Traditional, Wholey Wheat and Spelt, all available on Amazon and some East Coast supermarkets.

Challah mixes

Definitely an “A” for packaging; I think the cute boxes would be great for gift baskets. Inside, the boxes include a yeast packet and mix while the back of the box has detailed instructions. I decided to start with the Traditional. For this one, you need eggs, oil, and, water. Sesame or poppy seeds (for the top) and sugar (for the egg wash) are optional. The preferred method for mixing is with a stand mixer although it does say it can be done with a bread machine or by hand. My Kitchen-Aid is my challah making friend for sure! After following the mixing directions, the dough appeared as in photo 2 below. It was definitely much stickier than my go-to challah recipe. The first rise is only 10 minutes and it did not rise all that much. After the 10 minute rise, I braided the challah and applied the egg wash (which I did add a little sugar to). It was definitely much stickier dough than I am used to working with but I didn’t have any trouble rolling it out on my silicone mat.

Tribes-A-Dozen Traditional Hallah

After 45 minutes of rising on the parchment-lined baking sheet (again little visible size increase), it then baked for about 25 minutes and came out this lovely golden color (picture 4 sitting atop my awesome bread warmer stone). I do have to say that he beautiful color is thanks in part to the yummy farm fresh eggs from my friend Andie’s Farm. Now that we’ve switched to farm fresh eggs, we won’t go back. The difference is amazing. Andie’s even done a comparison on her blog if you need further evidence of the merits of farm fresh.

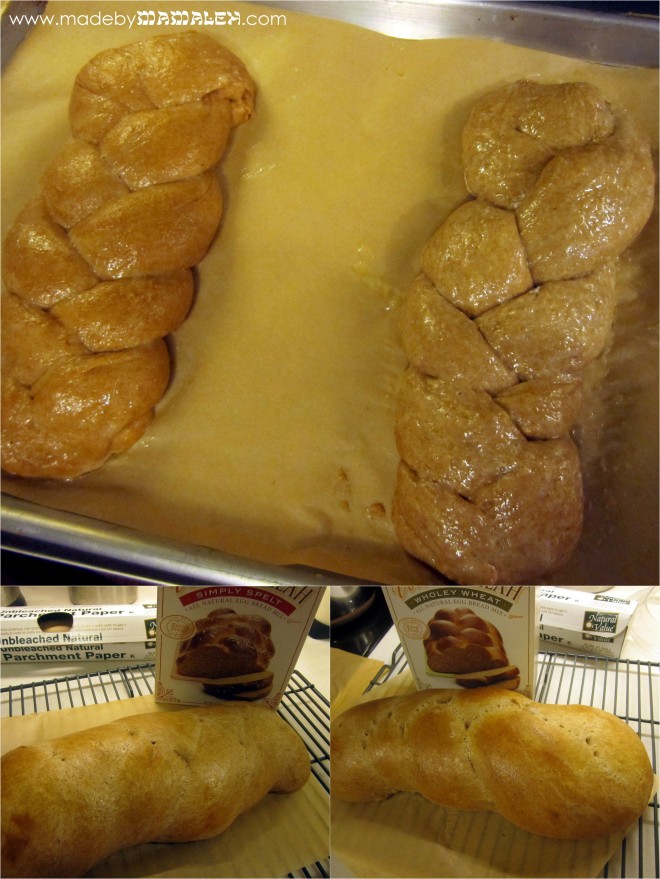
As the Traditional was rising/baking, I set to work on the Wholey Wheat and Spelt. Both call for the same additional ingredients as the Traditional along with some honey. The directions vary from the Traditional and call for longer rise times, so be sure to follow them carefully.

Wheat & Spelt Hallah Mixes by Tribes-a-Dozen

Even after the longer rise, both were quite sticky but again manageable on the silicone mat with some flour for forming the loaves. Now I’m not sure if I didn’t braid them tightly enough or what but as you can see in the photos below, the braids lost their definition after baking. I looked through the tips on Tribes-A-Dozen’s page and couldn’t find anything that might explain this.

Spelt and Wheat Challahs

Here are all three nice and toasty in the bread basket with my warming stone:

Tribes-A-Dozen Challahs

I’d note that each box says it makes one large or two small loaves or 8 rolls. My experience was more like 1 medium loaf per box (at least in comparison to the recipe I usually use which makes three small loaves). With the rising and baking all done, it was time for the biggest test of all: TASTE. Here are all three sliced:

Tribes-A-Dozen Hallahs from mix

They were all good but definitely not as good as scratch. I told my husband and our friends doing the taste testing (on Christmas of course!) that the comparison should be whether they are better than store-bought. The consensus was they are better than your average grocery store challah but probably not better than a decent bakery. The texture on the Traditional just wasn’t quite what I’d hoped for and look for in a challah. Although you do get the added benefit of getting them warm from the oven which is a big plus. The stand-out was the Wholey Wheat, which despite it’s undefined braids, had a really yummy wheat flavor and great texture – much better than the whole wheat challahs I’ve made before. So, if you are not a challah purist, I think the wheat is definitely worth a try. As for the others, I’m on the fence. I think that if you are new to baking bread and/or challah, they are a good way to ease in on a smaller scale. They also do simplify the process and shorten it time-wise which is a selling point too. Like I mentioned before, I also think they’d be sweet in a housewarming gift basket along with some dish towels and measuring cups or other kitchen essentials.

What do you think?  Would you try challah from a mix?

HAPPY NEW YEAR! L’Chaim!

P.S. In case you missed the post on Facebook, Heidi was the winner of the Michael’s gift card.  Remember to follow Mamaleh on FB for more fun posts and tips in between blog updates.  Just be sure to click show in News Feed under the like button so that you don’t miss any posts.

Note: I was not financially compensated for this post. I received Tribes-A-Dozen mixes  free for review purposes. The opinions are completely my own based on my experience.

Shabbat = WINE {& A GIVEAWAY!}

Jewish Wine Charms

What’s Shabbat without a little wine (or at least a little Martinelli’s)?  I mean you can’t celebrate Shabbat without saying kiddush.  The problem is it can be hard to remember who’s glass is who’s (especially after you’ve had a  glass or two).  Hence, the usefulness of the wine charm – a cute and easy way to identify your glass.  Today’s project is a set of wine charms just for Shabbat – a  bridal shower gift for a friend.

Jewish Wine Charms with Swarovski Crystals

This type of wine charm is simple to make even if you don’t have much experience working with pliers and beads.  Here are the supplies I used to make these:

Supplies needed for Jewish wine charms

  • Jewish charms – probably the trickiest thing to find but 1-800-DREIDEL has an amazing selection of charms along with all sorts of Jewish craft stuff and I just have to say, they also have some of the best customer service I’ve seen lately (my order came 2 days later and they adjusted the cost of shipping because the package was so small!).  Since this is a Shabbat set, I chose a challah cover, challah, candlesticks, Shabbat table, kiddush cup and a bottle of kosher wine.  I have Passover set  I made for myself a while ago that I’ll have to share one of these days.
  • Beads – 2 Swarovski 4mm bicones in a rainbow of colors and 2 silver seed beads per charm but you can use whatever strikes your fancy. 
  • Jump Rings – 1 for each charm
  • 3/4″ Manipulating Hoops – many styles, colors and materials are available. Remember you don’t need fancy silver since these are just going on your glasses not in your ears
  • Pliers

Jewish wine charm tutorial

First thing you’ll want to do is attach a jump ring to each of your charms.  If you’ve never worked with jump rings before, here’s a good jump ring tutorial.  After you have the charms on the jump rings, you’ll then string your beads on the hoop in whatever pattern you like.  Once that’s done, you’ll want to bend the hoop.  Take the pointy end and grip it with your pliers and bend it 90 degrees so that it makes a little hook to go into the eye on the other end and secure your charm closed.  

Just repeat these steps for however many charms you want and you are done!  I started with a set of six Shabbat charms but decided to add 2 with the saying “Ani L’Dodi V’Dodi Li” – “I am My Beloved’s and My Beloved is Mine”  with the couple’s initials for a sweet wedding memento. 

Ani L'Dodi V'Dodi Li Wine Charms

Since this set is a gift, I wanted to make sure they were nicely packaged so I took a greeting card box (you could use a leftover one or they also sell these at packaging/paper stores) and then made a customized insert with holes for the charms.  I got fancy and did a print and cut using my Cameo and Silhouette Studio but you could do this simply using a hole punch and a nice piece of cardstock.

Jewish WIne Charms

But, I couldn’t stop there…I decided I needed to make a uniquely Jewish gift bag so using my new hamsa stamp (another 1-800-DREIDEL find) and one of my “Mazel Tov” stamps, I embossed a little gift bag.

Jewish wedding gift bag

Want to win our very own set of Shabbat wine charms and save yourself from having to get out the pliers?  Leave a comment on the blog and then click the link below to be entered to win on Rafflecopter

 CLICK HERE to enter Shabbat Wine Charm Giveaway!

Extra entries for liking Made by Mamaleh on Facebook, liking this blog post on FB, following madebymamaleh on Twitter and sharing this giveaway on your FB page and tagging madebymamaleh in your post!  The contest ends at midnight on Saturday, July 21st!

Jewish Wine Charms

L’chaim!

Challaaaaaahhhh!

Honey Glaze Challah

Until this year, I’d never made challah before. Of course I love to eat it but the thought of making it totally intimidated me (probably because I remember one attempt by my mom when I was a kid did not resemble challah at all, sorry, mom). In an attempt to cook more and put my cookbook library to good use, I challenged myself at the beginning of the year to try one new recipe a week. For the most part I’ve kept up with the challenge, some weeks cooking less and some more.  But, what I’ve found is that trying different challah recipes has played a big role in the challenge and I’ve figured out that making challah really isn’t so scary and actually the process is rather therapeutic after a hectic week.

As I mentioned the other week, I love The Challah Blog as it has lots of fun innovative challah ideas and fantastic tutorials for braiding. But, so far my go-to challah recipe has been derived from Tante B’s “Famous Challah.” I’ve made my own addition to the glaze and also simplified her process since I am lazy efficient and like to rely heavily on my trusty Kitchen-Aid. In fact my Kitchen-Aid has gotten such a workout since the beginning of the year that my husband had to replace the grease inside (that has made it work even better and at some point, I’d be happy to share how he did it).

This recipe has worked really well every time I’ve made it at home (Seattle).  But, I even tried it in the desert (Las Vegas) where I was told bread just doesn’t rise right and it turned out great.  It’s not very eggy as far as challah goes but it is quite delicious, especially with the hint of honey on top.  So, if the idea of making your own challah scares you, I promise, it’s a lot easier than it looks so give it a try one of these days.  Happy baking!

Ingredients for 2 large challot:

7 cups of all-purpose flour
2 packages or 4 ½ teaspoon of dry yeast
2 eggs (1 for dough, 1 for glaze)
½ cup vegetable oil
1 Tablespoon salt
½ cup sugar
2 cups warm water
Honey to taste (for glaze – I love the specialty NW honeys available like blackberry)
PAM or extra vegetable oil (for bowl)

Directions:

1.  In bowl of stand-mixer combine 1 Tablespoon sugar (removed from the ½ cup), 2 cups warm water and yeast.Let sit for roughly 10 minutes until the yeast has dissolved and is foamy. It should go from the top picture to the bottom in about 10 minutes.

Challah

2.    Once yeast is nice and foamy, add the remaining sugar, salt and 3 ½ cups of flour.  Mix using the bread hook.

Kitchen Aid Mixer challah

3.    Add egg and oil.  Mix.

4.    Add remaining 3 ½ cups of flour slowly and mix using bread hook.You may need to scrape the dough off the hook several times and put it back in the bowl. Keep mixing until the dough has formed a nice ball and springs back when pressed with your finger.  If for some reason, it’s still too sticky, add a little flour.

5.    Spray a bowl with PAM (you can also swirl veggie oil on the sides but I find PAM oh so easy) and put the dough in the bowl. Cover with Saran wrap and a dish towel and put somewhere warm to rise. If it’s cold out you can turn your oven on to 150 and then turn it off and put the bowl in there to rise. The dough will look like the picture on the top. After an hour (or more), it should look like the photo on the bottom.

Challah

6.     When the dough has risen, give it a good punch down with your fists and then put it back to rise some more. Depending on how rough a week I’ve had, I may give it a second punch down but I haven’t found this critical in making this recipe work.

7.    After 2 hours, turn dough onto silicone mat to roll out.

8.    I use my hands to split the dough into two even sized balls – one ball for each loaf.  If you want to make three smaller loaves, as I did last week, just split it into three.

9.    Then with each of those balls, portion out the dough according to the number of braids you need. Here, I did 3-strand loaves but there are tons of options out there.

10.  Roll out each little ball on the silicone mat being sure to work out any air pockets and then braid directly on baking sheet covered in either parchment or silicone baking mat using whatever braiding style you prefer. (I recently upgraded to an extra-large baking sheet that takes up my whole oven that can hold 2 large or 3 small loaves. Now I just need to find the right size silicone baking mat for it!)

11.  Once the loaves are braided, cover them with a dish towel and let rise for 30 minutes.

12.  Preheat oven to 375°F.

13.  After allowing loaves to rise, beat remaining egg in bowl.  Using silicone pastry brush, lightly brush over each challah. Then drizzle honey on top, to taste and also brush on using same silicone brush.
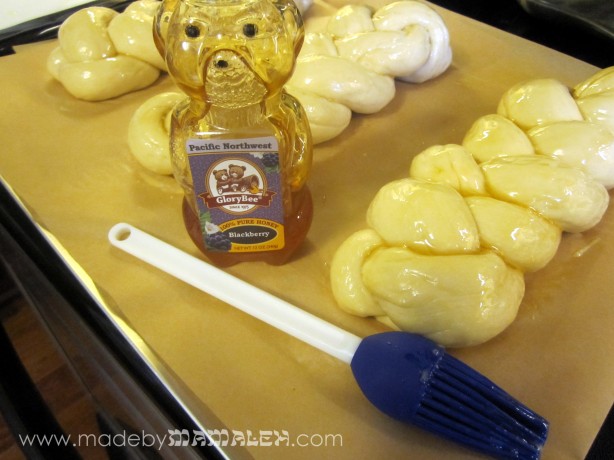
Challah honey glaze with pacific northwest blackberry honey

14.  Bake for 25 minutes. Then, turn off oven allow the challah to sit in the oven for another 10 minutes.

15.  Remove and allow to cool on rack.  Enjoy!

challah

Winner, winner, Shabbat dinner!

As I write this, the most delicious smell is wafting from my kitchen and I only hope the result will taste as good as it smells!  I have been home all day with a sick bubelah so decided it was a challah-baking kind of day.  But, rather than go with my fav traditional recipe (which I’ll share with you another time), I decided to go with one from one of my favorite Jewish cooking blogs: The Challah Blog.  I mean what is there not to like about challah, but Amanda over at The Challah Blog takes it one step further with all kinds of fun kinds and shapes (great tutorials in this regard – it is now my go-to braiding reference).  A while ago, she posted about a maple syrup challah  that sounded divine.

A few preliminary thoughts: 1) I used the maple syrup cold from the fridge (since we always have it on hand) and my yeast did not foam up as much as usual so I wonder if perhaps this would work better at room temp; and 2) I am used to a recipe that makes two BIG loaves of challah which this didn’t.  It made two lovely smaller loaves (which is probably just as well for our waistlines).

Mmmmm….I just had a bite and it is delish and has a really nice texture.  I took Amanda’s advice and sprinkled cinnamon on one but I agree, I want even more of the maple sweetness.  I wonder how to achieve that?

Finally, we have a winner from our little Earth Day giveway, using a random number generator for a number between 1 and 8, I got #3: KaraAnne Grodin!  Shabbat shalom to all!  I’m off to have some wine and challah 😉