Kid-Friendly Tu B’Shevat Mini Art

Tu B'Shevat Mini Canvas Art

Tu B’Shevat is one of those Jewish holidays that many of us probably don’t even realize is happening unless we are looking at our Jewish calendar or have kids in religious school.  A minor holiday, literally the 15th of the month of Shevat, Tu B’Shevat celebrates the New Year of the Trees.  (And, just a little known fact, it’s actually one of four new years observed on the Jewish calendar.  In Israel, Tu B’Shevat is much like Arbor Day in the U.S. and is marked by the planting of trees and ecological awareness.  In Jewish tradition, Tu B’Shevat is often marked with a seder (or ritual meal) where fruits and nuts symbolic of Israel are eaten.

For the first time in my life, we’re actually talking about Tu B’Shevat in our house:  My son’s Sammy Spider calendar has a nice recipe for trail mix and a picture of a tree.  His preschool class is having a seder.  We’ve been reading our PJ Library books about the holiday.  Our temple’s Young Families’ group (of which I’m co-chair) is having a special brunch.  So, with all of that going on, I felt like we needed to make a little something since what’s a holiday without a little a decoration.  I wanted something kid-friendly to make yet also polished enough to sit out on my mantel and look sharp.

A while back, during one of my craft store runs (probably Michael’s), I came across these cute mini canvases and got a couple of sizes as well as a mini easel, thinking that they’d be great for changing holidays/seasons.  So, I decided to take the 4×4 canvas and create a little mini Tu B’Shevat art with my son’s help of course.

Tu B'Shevat Kid-Friendly Art

First step was to find just the right tree in the Silhouette Online Store to cut out with my Cameo.  Now, if you don’t have a die-cutter, don’t worry, I am sure you could easily find a pre-cut tree at the craft store or you could freehand one with scissors or an exacto.   I chose this tree branch lace and then using Silhouette Studio I erased the edges and size it to fit my canvas. Next, I cut it out of Paper Trey Ink Dark Chocolate cardstock.  I then coated the mini canvas with Matte Mod Podge using a foam brush and applied the tree, trimming the edges as necessary.  Once it was all lined up, I painted more Mod Podge on top completely covering the tree and allowed it to dry.  The application of the Mod Podge is a totally kid friendly activity since there is no precision required, just make sure the canvas is covered.
TU B'Shevat Art Canvas

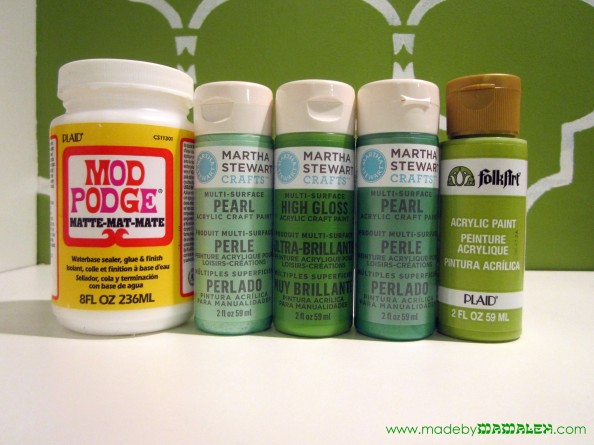
Shades of Green (from left to right): Martha Stewart Mint Chip Pearl, Martha Stewart Scottish Highlands High Gloss, Martha Stewart Putting Green Pearl & Folk Art Citrus Green

For the next step, I selected four different shades and finishes of acrylic paint since I wanted depth of color and texture.  To apply the leaves, rather than have my son dip his finger in the paint (and get too much on), I applied it to his finger using a foam brush and then let him fingerprint the leaves.  No special order, just mix up how often you print each color. We both took turns doing this and going all over the top of the tree as well as the top and sides of the canvas.

Kid-Friendly Tu B'Shevat Mini Canvas

Once the tree was filled in, I left this to dry for a bit as I worked on the final piece, a die-cut banner that said “Happy Tu B’Shevat!” which I created using the print and cut feature in Silhouette Studio on kraft cardstock.  I then positioned this where I wanted it using the Mod Podge and gave the whole piece a couple more coats to finish it off and ta-da: kid-friendly, yet simple and chic mini-canvas decor for Tu B’Shevat for year’s to come!

Kid-Friendly Tu B'Shevat Canvas

Dreidel Spin Art Thank You Notes

Dreidel Spin Art by Kiwi Crate

Ack!  Where has the time gone?  It’s already January 13th and we still haven’t finished our holiday thank yous (and Hanukkah was so early, it’s even worse)!  Oh well, I figure as long as they get ’em before Valentine’s Day, we’re in good shape and better late than never, right?  I was taught from a young age the importance of writing a nice note of thanks for a gift and I am trying to install the same in my son, Avi, even at age 3 1/2. One thing that I think helps make the process a bit more fun is to make the cards yourselves.  If you recall, we had a lot of fun doing the dreidel spin art from our Hanukkah Kiwi Crate back in December.  I saved all of those little paintings thinking they’d come in handy for something like thank you notes and sure enough they did.

Hanukkah thank you note

The process was simple and kid-friendly.  Starting with some nice colored A2 notecards from Memory Box (I get all mine at Impress in Seattle), Avi and I used a glue stick to glue down the paintings.  After gluing them we put them under a stack of books to help them lay flat.  Meanwhile we stamped “thank you” on some scrap white cardstock in turquoise and trimmed it up into cute little squares -I realized just how great my mini guillotine  paper cutter is for little hands (with adult help of course!)  Then we attached these using my favorite adhesive and finished off the look with some scattered star sequins glued on.  And to explain the art like any good artist’s print, I put a little handwritten “Dreidel Spin Art by Avi” under each of the paintings.  Absolutely perfect kid thank yous!

Hanukkah thank you notes from dreidel spin art

The last lights of Hanukkah 2012

As Hanukkah 2012 draws to a close, I want to share one final Hanukkah project with you.   As you are probably painfully aware, finding a Christmas T-shirt or pajamas (or anything) for kids is so easy but Hanukkah-wise, you’ll be lucky to find anything.  Last year, I lucked out and found a “Dreidel Champion” T-shirt by Carter’s.  This year, armed with my trusty Silhouette, I decided to make my own using simple Ts from Old Navy and a variety of vinyl.

First up is my own version of the “Dreidel Champion” for a friend’s son:

Dreidel Champion 2012 t-shirt

Now, love or hate the whole princess thing, we all know it’s popular with preschool girls.  So, I decided why not embrace it and give it a new twist by creating a Dreidel Princess!  For this shirt I used a combo of plain, glitter and flocked heat transfer vinyl as well as rhinestones of course.  Next year I may need an adult version…

DIY Hanukkah shirt for girl

I had bought some purple foil star of david ribbon on one of my 1-800-Dreidel shopping trips and couldn’t resist the chance to use it for a matching bow.  A little hot glue and a pony tail holder and I was in business.

DIY Star of David hair bow

Finally, for my own mini-mensch, I’d planned to do a collage of numbers since counting is rather popular in our house at the moment but he informed me that he wanted a menorah so a menorah he got.  Using gold glitter vinyl and several shades of blue in plain and flocked, I created this “8 Crazy Nights” shirt.

8 Crazy Nights t-shirt

He absolutely loved it (he wore it more than once!).  I just can’t resist the chance to show off his Hanukkah (and all around) cuteness.  Hope your Hanukkah was as full of sheer joy as mine!

8 Crazy Nights Hanukkah t-shirt

As Hanukkah reminds us of the miracle of light,  there are so many positive ways that we can channel our collective feelings of  sorrow surrounding the Newtown tragedy.  My heart aches for the families and I wanted to share one outlet that speaks to my creative side.  One of my favorite crafty blogs, Damask Love  has created a very special project to inspire healing through creativity.  Check it out if you are looking for a non-traditional way to help.

Hanukkah crafting from Kiwi Crate! Ima Design winner!

I have to admit – I’m generally not one to purchase pre-fab crafting kits; I have hoards of craft supplies so if I want to make something, I generally only need to get a couple items.  But when Kiwi Crate contacted me and asked if I’d like to try out their Handmade Hanukkah kit, I figured why not.  I’m always open to try something new.

Kiwi Crate is a children’s creativity company, targeted for kids ages 3-7.  They offer monthly subscription activity boxes as well as special projects like the Hanukkah box.  Each crate is filled with enriching & engaging kid-tested projects which cover a range of developmental areas and subjects, including art, science, and imaginative play.

The box arrived nicely wrapped in brown packing paper with a big Kiwi Crate logo and addressed directly to my son (which was a big hit of course).  This was a nice touch in the age of elaborate, difficult to open packaging; no box cutters were needed, so my son could open it himself.

When my son managed to rip the paper off, we found the darling little Kiwi Crate Box filled directions and the makings for two Hanukkah projects: a tissue paper covered menorah (battery operated) and dreidel spin art.

Speaking of the directions, they are fantastic!  Being a crafty mamaleh, I probably could have gotten by without them. But for those less craftily inclined, the details and pictures make the projects easy.  I imagine that they’d be great for kids of reading-age too.

We decided to start with the menorah.  The materials included candle holder, tissue paper, glittery Mod Podge with tray, foam brush, shamash holder,  foam for the shamash, and LED flicker candles.  The process itself was simple albeit a little messy.  It was my first time using glitter Mod Podge and I found myself daydreaming about what grown-up projects I might be able to use it for as it was just pure sparkly goodness.  I will say though that my three-year old’s attention span waned after about 2 candle holders so I was left to finish the rest on my own.  I do think that makes for a project which could easily be shared by multiple kids – I sort of wished we’d invited friends to do it with us.  It wasn’t until the menorah was all dry, that my son regained interest when it came time to “light” the “candles.” I must say, it’s pretty cute and fun and will be a nice, non-fire hazard menorah to use for the holiday.

Tissue Paper Battery Menorah from Kiwi Crate

Next up was the dreidel spin art and I gotta say this was super fun for both of us! But oy, was it messy!  Be sure to put on smocks and do it on a drop cloth of some sort (we used a coated tablecloth on the floor).  You use the included plain wood dreidel and pre-cut pieces of paper to do spin art in the Kiwi Crate box.  I loved how many pieces of paper were included – ample enough for 2 or 3 kids to do a bunch.  And when you’re done, there are Hebrew letter stickers included for the dreidel to restore its traditional Hanukkah role. My only wish was that the box had been a bit taller since the paint splatter definitely went over the sides (to its credit, it did wash off pretty easily).

The resulting art is really fun and unique.  Perhaps we’ll use them to create Hanukkah gift thank you notes by putting them on a notecard and adding some stamped cardstock on top to cover the hole.

Overall, I was pleasantly surprised with the Kiwi Crate.  As an avid crafter who generally likes to do my own thing, it was sort of nice to be given direction.  Along those same lines, it was nice to not have to worry about my son destroying my own supplies to do his project. Everything we needed was included in the box which I think is excellent way to help people who feel intimidated when they go to a store like Michael’s or Joann. Even I get overwhelmed at those stores with the variety of supplies and tools available. I think Kiwi Crates are creative and fun gift ideas; I may have to order a few for friends.

Oh and I almost forgot, the winner of the Ima Design contest is #1, Jamie.  Look for an email with details!

Note: I was not financially compensated for this post. I received a Hanukkah Kiwi Crate free for review purposes. The opinions are completely my own based on my and my son’s experience.

A Very Toddler Passover!


Since I am home with a sick boy, I thought I’d take the opportunity for a little Passover follow-up. The Passover story we tell every year is such a rich one but it often gets lost amidst hunger and outdated haggadot. This year our 2nd night seder was tailored specifically to our youngest guests – a group of toddlers from our PEPS group (if you aren’t in Seattle, PEPS stands for Program for Early Parent Support).

Using the URJ’s seder for toddlers age 2-3 as a template, I copied the content and added my own into an easy to hold program just for the adults using MS Publisher.  I even pre-assigned the sections to help expedite things! The content was written for kids and they really did a good job of following along and paying attention.

In addition to this, I pre-downloaded this song about the 10 plagues which we played at the appropriate part of the seder and which was a big hit with the kids.  Since a group of toddlers is very into numbers and colors, this was the focus for our seder table.  For the 4 cups of wine, I used clear plastic shot glasses (a novel use for these I am sure) and used the print and cut feature on my die-cut machine and clear label paper to create numbered toddler-size cups for each of the four glasses.  I also created plague bags with a  label with the numbers 1-10.

Placemats were made using primary colors of scrapbook paper which made for not only easy cleanup but easy personalization, with each child’s name written across the bottom.  The dishes were ones I had picked up at Target a couple years ago on sale – I love them!  Each kid got a toy hammer for pretending to hammer along with one of the songs.  Such fun!

The plague bags themselves were filled with stuff to go along with the song.  You’ll note the “blood” confetti above that I made using red cardstock and my die-cut machine and a raindrop image.  Even my husband was surprised when we sang about the blood and I suddenly tossed a handful of confetti at the kids.  The bags themselves contained a little shaker of confetti (hail), sunglasses (darkness), wind-up flying bug (lice), flies (flies)sticky frogs (frogs) and a band-aid (boils).  We didn’t have something for every plague but that was just fine, there was plenty to keep the kids engaged and involved in the seder.  Oh and one other tip, little bowls of cucumbers and carrots (karpas) for the kids to dip as necessary before it’s time for the actual meal.

Overall, it all turned out really well.  My husband said it was the best seder he’s ever been to!  I can’t wait to do a new variation next year!  Hope you all had a lovely Pesach!