As I may have mentioned before, I was a founder and chair of our synagogue’s Young Families group over the last several years. Last year we had a big Shavuot event with PJ Library where we read stories, made butter, had ice cream and waited two hours for a goat to arrive (don’t get me started). This year we wanted to do something low-key but also educational and fun.
Category Archives: Kids


Popping by to say Happy Purim!

It’s been WAAAAYYYY too long and I do apologize! Life has simply happened and I have been busy trying to keep up. I’m still here just not crafting as much as I’d like at the moment. But with Purim almost here (it starts Saturday night), it’s time to think about some Purim goodies! You might recall that last year after my son got lots of Valentine’s treats, I opted to make some fun mini mishloach manot instead. So, I decided to do the same thing again this year and since his pre-K class is on the smaller side, I decided to treat the kids to one of my favorite (and quite novel) Israeli sweets: Elite Milk Chocolate with Popping Candies, or in other words a chocolate bar with pop rocks! If you’ve never tried these, you are missing out! I must confess to you that when my husband (who back then was my boyfriend) and I did Birthright back in 2005, we came back with so many of these in our suitcase, I’m pretty sure the El Al agents had a good laugh at our expense. There are several places you can order these online but the prices are definitely higher than what you’d find in Israel or even locally. I was so excited when I discovered our local Safeway started carrying them, especially in Seattle!

So, in order to put together these cute mini mishloach manot, I designed some simple label wraps in Publisher and printed them on vellum for a fun look (my son was very intrigued that you could see through the paper). But really any paper or light-weight cardstock would work equally well. Each is 2.5 inches wide so you’ll get 4 per standard 8.5×11 sheet of paper – there are no cut lines just start from the left and cut every 2.5 inches. Once they are printed and cut, address them (as you can see my son is working on writing all of his letters) and use some cute washi tape to secure them in back and you have some adorable Purim treats. You can download the label wraps for yourself for some last-minute Purim printables.
These would also work well used as an addition to a traditional Purim basket of goodies. If you are looking for ideas in that department, two of my favorite Jewish blogs, Chai & Home and Design Megillah each have some darling ideas! What about you? Are you putting together any purim goodies?
Happy Purim!
Share this:

Countdown to Hanukkah 2013
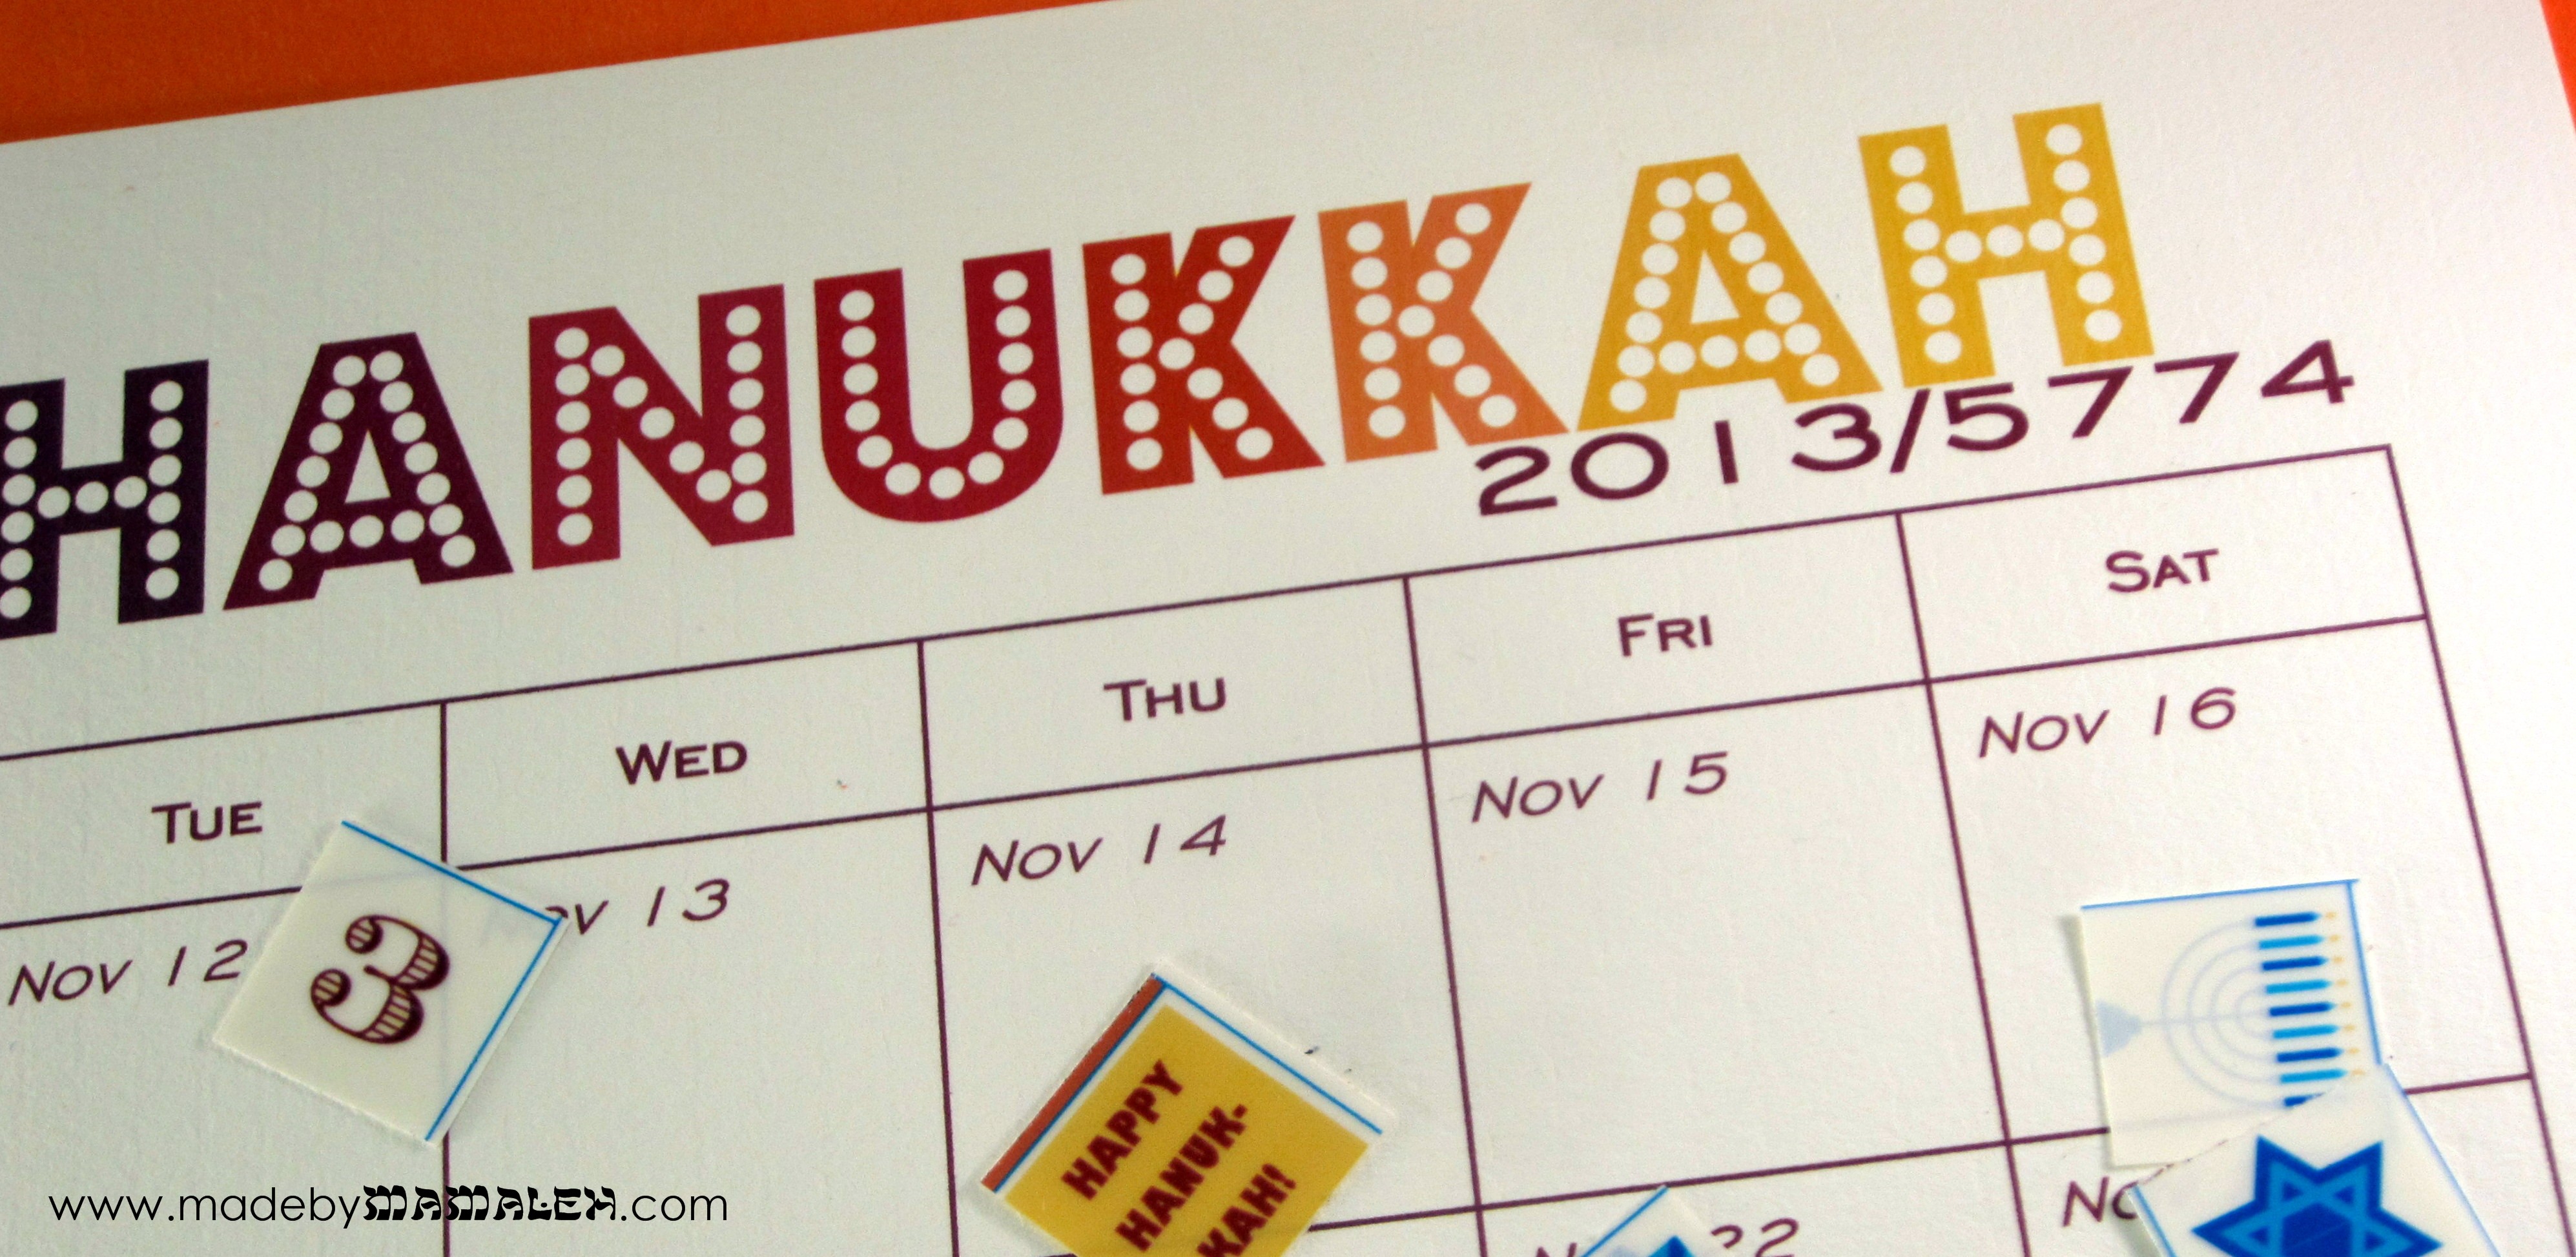
Ever since Halloween finally came and went last week, my four-year-old has asked me numerous times, “When is it time for Hanukkah?” So, since last year’s printable Hanukkah countdown calendar was such a hit, I decided to make a new version for this year. Since this year Hanukkah overlaps with Thanksgiving, I decided to embrace the fall colors to help your little ones count down the anticipation in the days leading up to Hanukkah (or Thanksgivukkah as so many are calling it). Unlike last year, I couldn’t make chai (18) to Hanukkah work thanks to the calendar configuration but it’s designed for you to start counting down on Sunday, November 10th.
Share this:

Color-in New Year Cards for Kids {& A Little Giveaway}

One of the paper crafting blogs I follow is A Blog Named Hero. A few weeks ago, they had an awesome post with an idea to make color-in thank you cards for kids using stamps. I absolutely loved this idea and decided to take that and make it work for Rosh Hashanah. Continue reading
Share this:

A Very Jewish Summer Day 3: Camp Care Packages With Love
Welcome to Day 3 of A Very Jewish Summer! I know for many people summer evokes memories of Jewish summer camp and specifically sleep-away camp, your first adventure away from home. Growing up in Southern Oregon, I never got to experience Jewish summer camp but having gone to college 3,000 miles from home, I know firsthand how much care packages from home mean. My little one has a way to go before he heads off to camp by himself (though I am very excited we’ll be heading to Jewish family camp at the end of the summer!). So, since I have several close friends whose kids will be at camp this year I decided to put together a combo of DIY and store-bought goodies to send them a little love from Mamaleh.

First, a little something to send some love back home (and maybe a thank you note to yours truly) : personalized stationery. I realize we live in the era of email and text but I think there is nothing better than an old-fashioned letter or card. I decided to give this a Jewish twist by including both English and Hebrew names on the cards. Using Microsoft Publisher, I created my own custom A2 size (4.25″x5.5″) template and then created a text block at the top, inserting a little symbol in between the English and Hebrew. (If you need help using hebrew fonts on your computer, or are looking for some stylish ones, check out my earlier post on the subject.) Then I printed these out on a variety of nice cardstock and cut the cards (by making them A2 size, you get 4 cards per 8 1/2 by 11 sheet of cardstock). I even rounded the corners on some for a little something extra.

To finish off these sets, I paired them with basic A2 envelopes, cute kid-friendly stamps and matching little folders cut from this folder template using Silhouette Chipboard, layered with cardstock and then stamped and embellished with a little glitter glue. A tip for the folders – be sure to let the glue set after gluing down the tabs on the sides by putting some pressure on it – I used binder clips which worked really well to hold it in place until it dried. Last, I punched holes and tied them shut with a little piece of ribbon.

Besides personalized stationery, I had visions of glow-in-the-dark kippahs for Shabbat and Havdallah under the night sky. This proved a bit trickier than I’d envisioned. I started with some grey suede kippahs from bestkippah.com (I found this was one of the few places that allowed me to order a single dozen versus the several dozen often ordered for weddings and other mitzvahs). My original plan was to try some glow-in-the-dark heat transfer vinyl but it wouldn’t stick to the suede so using my Silhouette for something more intricate was out.

Next, I tried a glow in the dark fabric marker – it worked on my first test kippah (above) but when I went to try it again the next day, it didn’t want to write on the suede, not exactly sure why, it was almost as if the nap of the suede prevented it from writing properly. Besides, it didn’t have the same glow factor as my third choice: glow-in-the-dark dimensional fabric paint. This is a bit tricky to apply because you may get a few bubbles or globs as you are squeezing it but if you go slow, it’s not too bad. Here are the kippahs I came up with (and yes, one is for a girl, gotta be egalitarian):
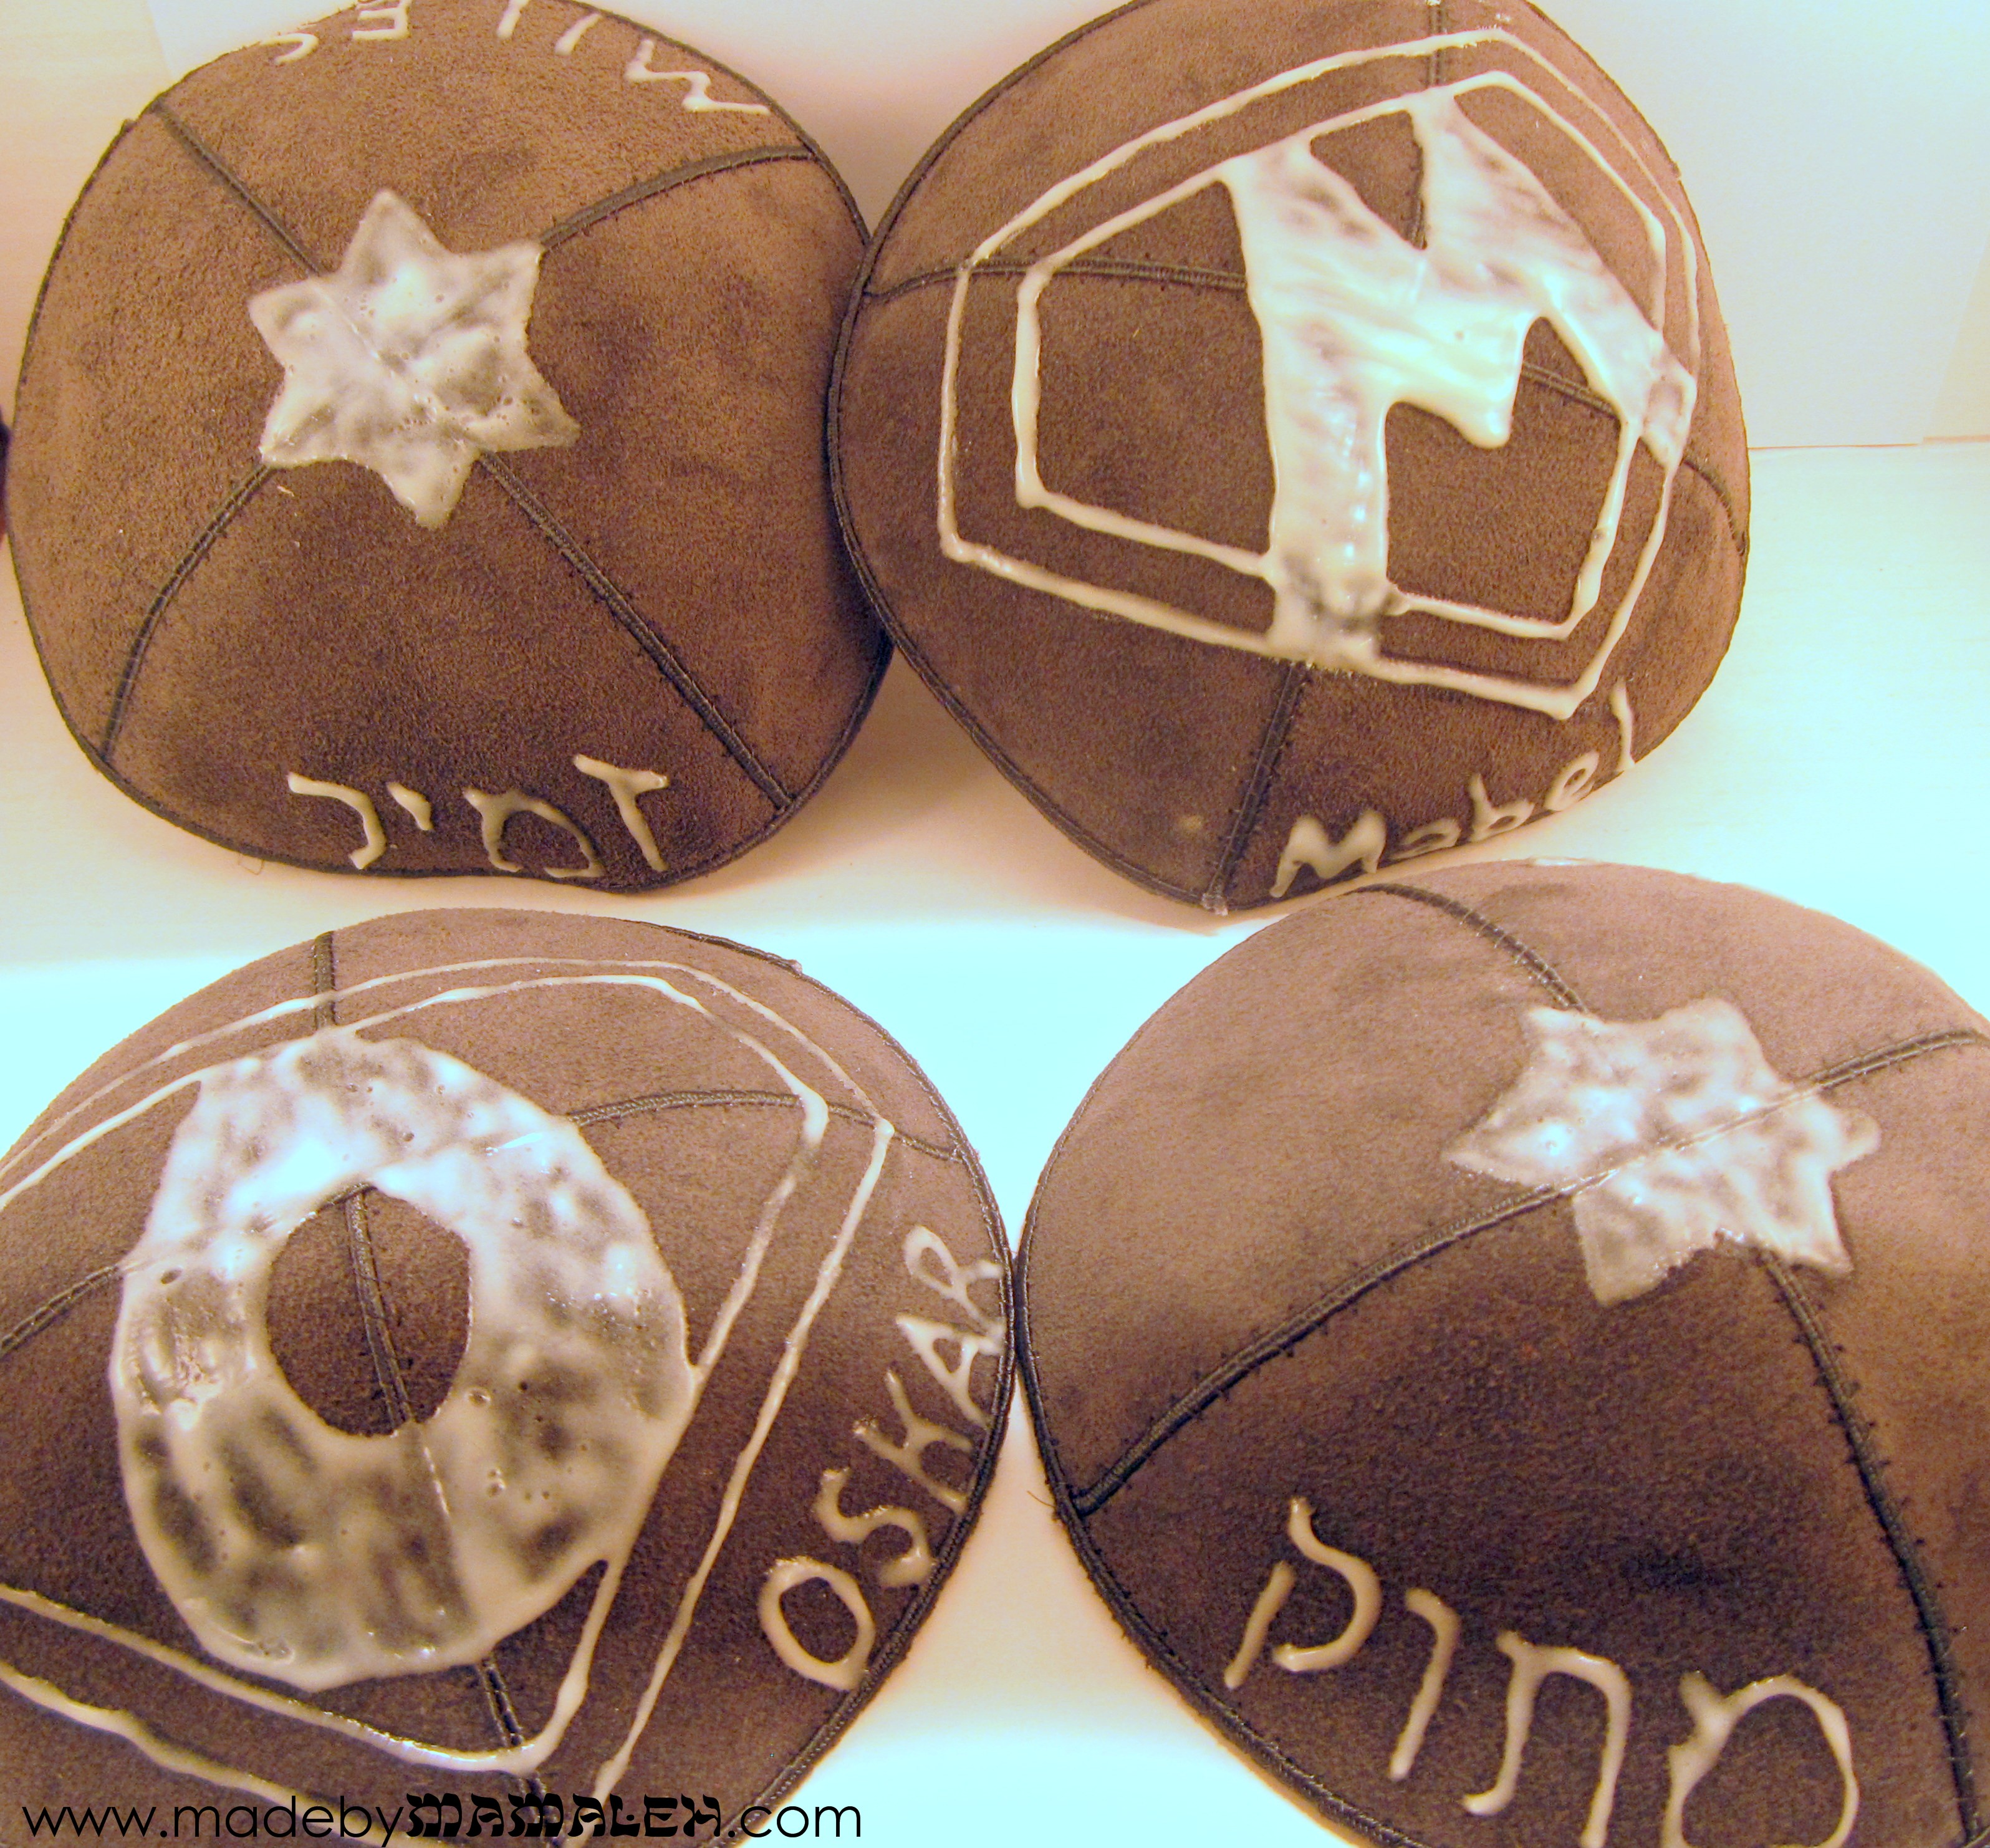
The result isn’t exactly what I was hoping for but I think it’s still fun and I am planning to go back over some areas to fill them in a bit more. I know from experience that putting too thick a layer of dimensional paint can prevent it from properly drying so going back over it after it’s completely dry is definitely the way to go. I also may keep my eye out for other colors of glow-paint to add a touch of color before I send these off. Most importantly though, they definitely glow in the dark (I tried to get a photo of this but it proved way too difficult), so hopefully they will be a hit with these kiddos!
Finally, I did a lot of searching for just the right store-bought additions to these care packages, a little bit of something for everyone:
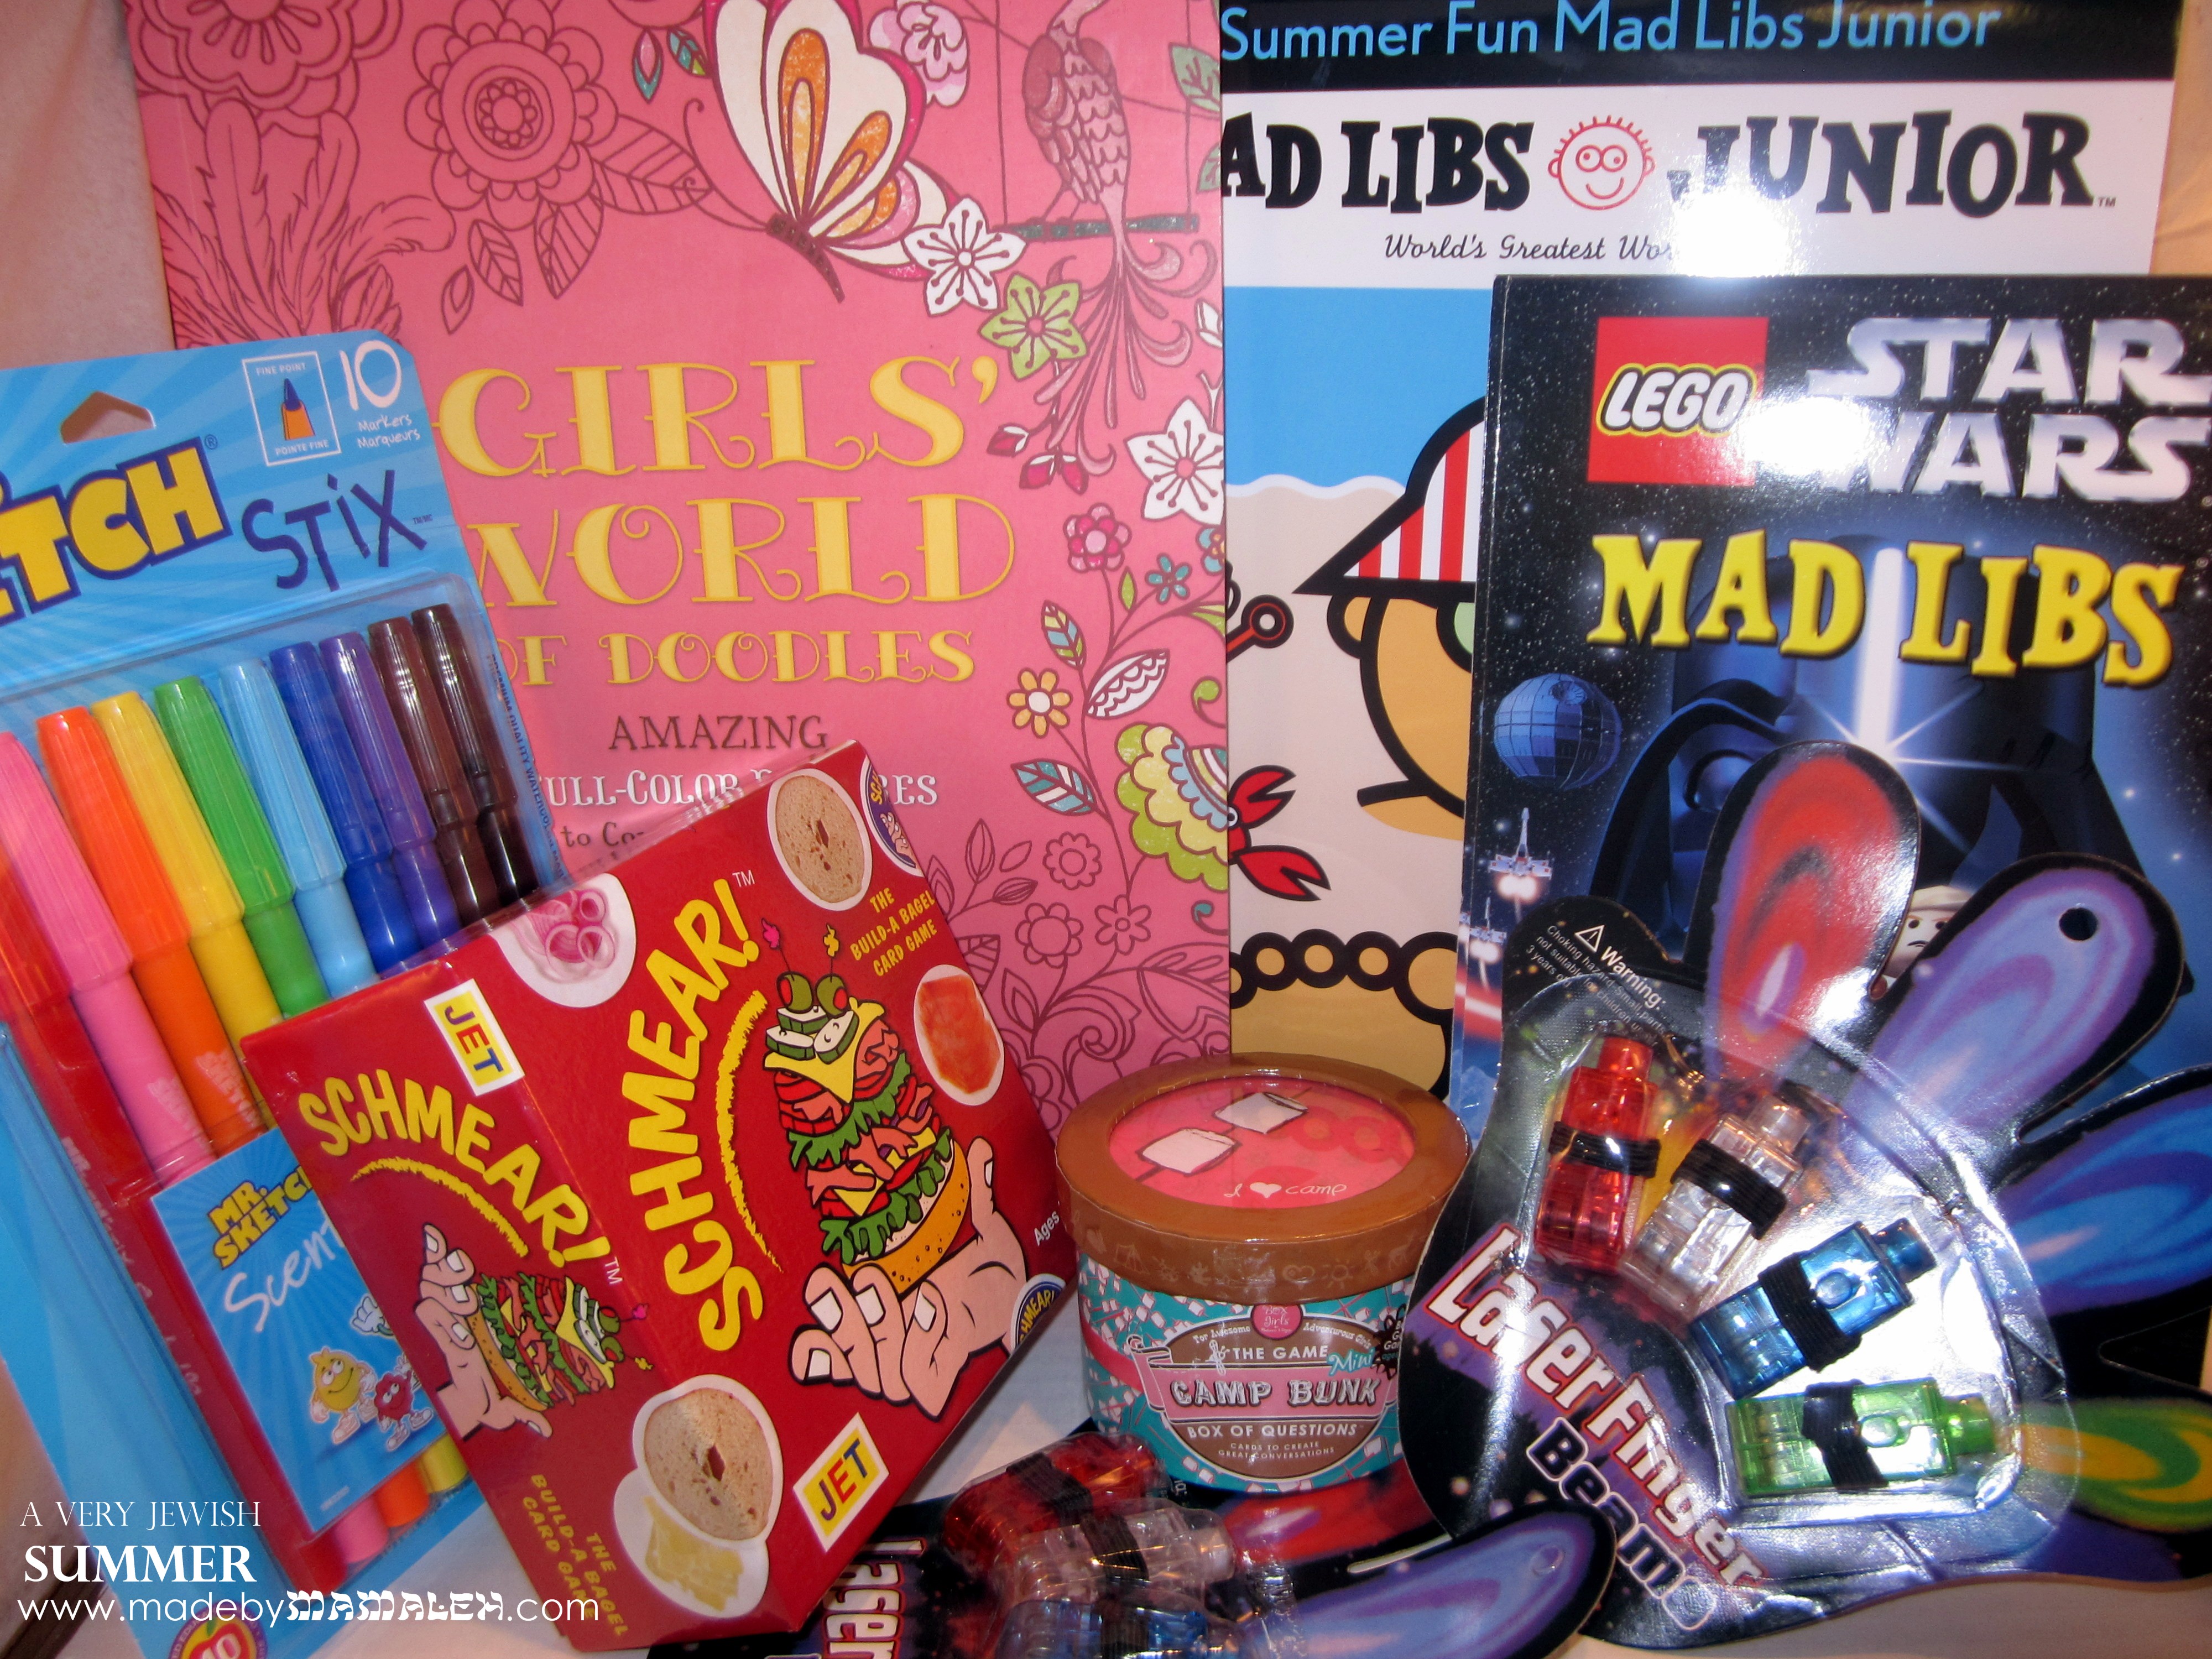 Mini Camp Bunk Box of Questions for some late night chit-chat fun; Girls World of Doodles – I must admit that I kinda wish I could keep this for myself just to spur my own creativity; Mr. Sketch Markers to use for doodling; Finger flashlights for late night reading or silliness, enough to share with the whole cabin; Mad Libs – these were one of my faves on long car trips so I figured they’d be great for camp as well: Lego Star Wars Mad Libs and Summer Fun Mad Libs Junior and finally the yiddish-named build-a-bagel card game Schmear which looks like a lot of fun!
Hope I’ve inspired you to be crafty and creative with your summer camp care packages this year. If you aren’t feeling crafty or if you’re short on time, you can always opt to send one from somewhere that specializes in camp care packages like The Wrinkled Egg or Sealed With a Kiss. One final thought, be sure to check what your camp’s care package policies are before sending – most don’t allow food and as a result will open things that are not obvious, hence I am not doing any sort of wrapping. I can’t wait to pack up all of these goodies and send them off! What about you? Are you planning on sending any care packages this summer? What are you including?
That wraps up Day 3 of a A Very Jewish Summer, hope you are enjoying the party so far! If you are just joining us for this blogging party, be sure to check out what you’ve missed so far – we started out with the lovely dinosaur cookies by Yenta Mamas for a prehistoric Shabbat treat followed by a lovely Shabbat Alfresco tablescape by Chai & Home and tomorrow we’ll be treated to a yummy recipe from Busy in Brooklyn. So stay tuned as a Very Jewish Summer continues!
Share this:

A Very Jewish Summer Day 1: There’s a…
DINOSAUR!

It’s here! It may be grey outside in Seattle but A Very Jewish Summer is kicking off today with a super fun post by the fabulous ladies of Yenta Mamas. I know in our house, the song they reference in today’s post gets lots of air time since my son goes to preschool at the JCC so I absolutely LOVE these cookies, especially the version wearing kippahs! Check out their blog for “A lot of baking, but mostly a lot of kibitzing” for even more fun ideas. As a lifelong frosted sugar cookie maker, I adore it!
 Stay tuned tomorrow for Chai & Home, followed by moi on Wednesday as I help you put together fun (Jewish) camp care packages as a A Very Jewish Summer continues!
Share this:

Mini Mishloach Manot

It’s time for Purim and we are really celebrating in our house this year! We are kicking off things off with my son’s preschool parade (he goes to the JCC) today, then we’ve got our synagogue megillah reading (complete with super-hero theme) Saturday night and finally to top it all off our big temple carnival on Sunday! I have one very excited 3 1/2 year old boy who’s been gearing up all week working on a grogger, hamantaschen and mishloach manot.
Now, as you know from my previous posts, I don’t have an issue with Jews choosing to celebrate Valentine’s Day and I myself love it. But, I will admit that I was a bit surprised to find so many valentines in my child’s cubby at the JCC since the past couple of years it hasn’t really made an appearance and isn’t something the school recognizes. I suspect this year’s increase was a combination of older sibs in public school, keeping up with peers and just a general desire to celebrate. So, I decided that rather than join this trend, we’d give everyone a little something for Purim since, after all, it’s one of the holiday’s mitzvot to give gifts of food to friends.
Technically, the idea is to give food so that everyone has enough for a Purim feast but in essence, the idea is to share love and harmony and we are talking preschoolers here. So, I decided to come up with my own mini mishloach manot (think class valentines meet Purim) that we could put in everyone’s cubby. Now, I realize hamantaschen are the traditional Purim food and I do love me some tasty hamantaschen – for my fave recipe, check out Martha’s hamantaschen dough and add your favorite jams, lemon curd or cherry pie filling. But, for this project I decided on bright, cheerful mini Unicorn pops.

A while ago, I bought this great clear set from Amuse Art Stamps that just said Purim parade to me (note: the line is now discontinued, sorry). I used these stamped simply in black ink on a variety of 3 1/2 x5 colored cardstock, wrote “Happy Purim!”, made a slit with my Exacto and then taped the lollipop to the card, making it look like the noisemaker being sounded by the little boy. The perfect mini preschool mishloach manot! Happy Purim!

Share this:

Kid-Friendly Tu B’Shevat Mini Art

Tu B’Shevat is one of those Jewish holidays that many of us probably don’t even realize is happening unless we are looking at our Jewish calendar or have kids in religious school. A minor holiday, literally the 15th of the month of Shevat, Tu B’Shevat celebrates the New Year of the Trees. (And, just a little known fact, it’s actually one of four new years observed on the Jewish calendar. In Israel, Tu B’Shevat is much like Arbor Day in the U.S. and is marked by the planting of trees and ecological awareness. In Jewish tradition, Tu B’Shevat is often marked with a seder (or ritual meal) where fruits and nuts symbolic of Israel are eaten.
For the first time in my life, we’re actually talking about Tu B’Shevat in our house: My son’s Sammy Spider calendar has a nice recipe for trail mix and a picture of a tree. His preschool class is having a seder. We’ve been reading our PJ Library books about the holiday. Our temple’s Young Families’ group (of which I’m co-chair) is having a special brunch. So, with all of that going on, I felt like we needed to make a little something since what’s a holiday without a little a decoration. I wanted something kid-friendly to make yet also polished enough to sit out on my mantel and look sharp.

A while back, during one of my craft store runs (probably Michael’s), I came across these cute mini canvases and got a couple of sizes as well as a mini easel, thinking that they’d be great for changing holidays/seasons. So, I decided to take the 4×4 canvas and create a little mini Tu B’Shevat art with my son’s help of course.

First step was to find just the right tree in the Silhouette Online Store to cut out with my Cameo. Now, if you don’t have a die-cutter, don’t worry, I am sure you could easily find a pre-cut tree at the craft store or you could freehand one with scissors or an exacto. I chose this tree branch lace and then using Silhouette Studio I erased the edges and size it to fit my canvas. Next, I cut it out of Paper Trey Ink Dark Chocolate cardstock. I then coated the mini canvas with Matte Mod Podge using a foam brush and applied the tree, trimming the edges as necessary. Once it was all lined up, I painted more Mod Podge on top completely covering the tree and allowed it to dry. The application of the Mod Podge is a totally kid friendly activity since there is no precision required, just make sure the canvas is covered.

Shades of Green (from left to right): Martha Stewart Mint Chip Pearl, Martha Stewart Scottish Highlands High Gloss, Martha Stewart Putting Green Pearl & Folk Art Citrus Green
For the next step, I selected four different shades and finishes of acrylic paint since I wanted depth of color and texture. To apply the leaves, rather than have my son dip his finger in the paint (and get too much on), I applied it to his finger using a foam brush and then let him fingerprint the leaves. No special order, just mix up how often you print each color. We both took turns doing this and going all over the top of the tree as well as the top and sides of the canvas.

Once the tree was filled in, I left this to dry for a bit as I worked on the final piece, a die-cut banner that said “Happy Tu B’Shevat!” which I created using the print and cut feature in Silhouette Studio on kraft cardstock. I then positioned this where I wanted it using the Mod Podge and gave the whole piece a couple more coats to finish it off and ta-da: kid-friendly, yet simple and chic mini-canvas decor for Tu B’Shevat for year’s to come!

Share this:

Dreidel Spin Art Thank You Notes
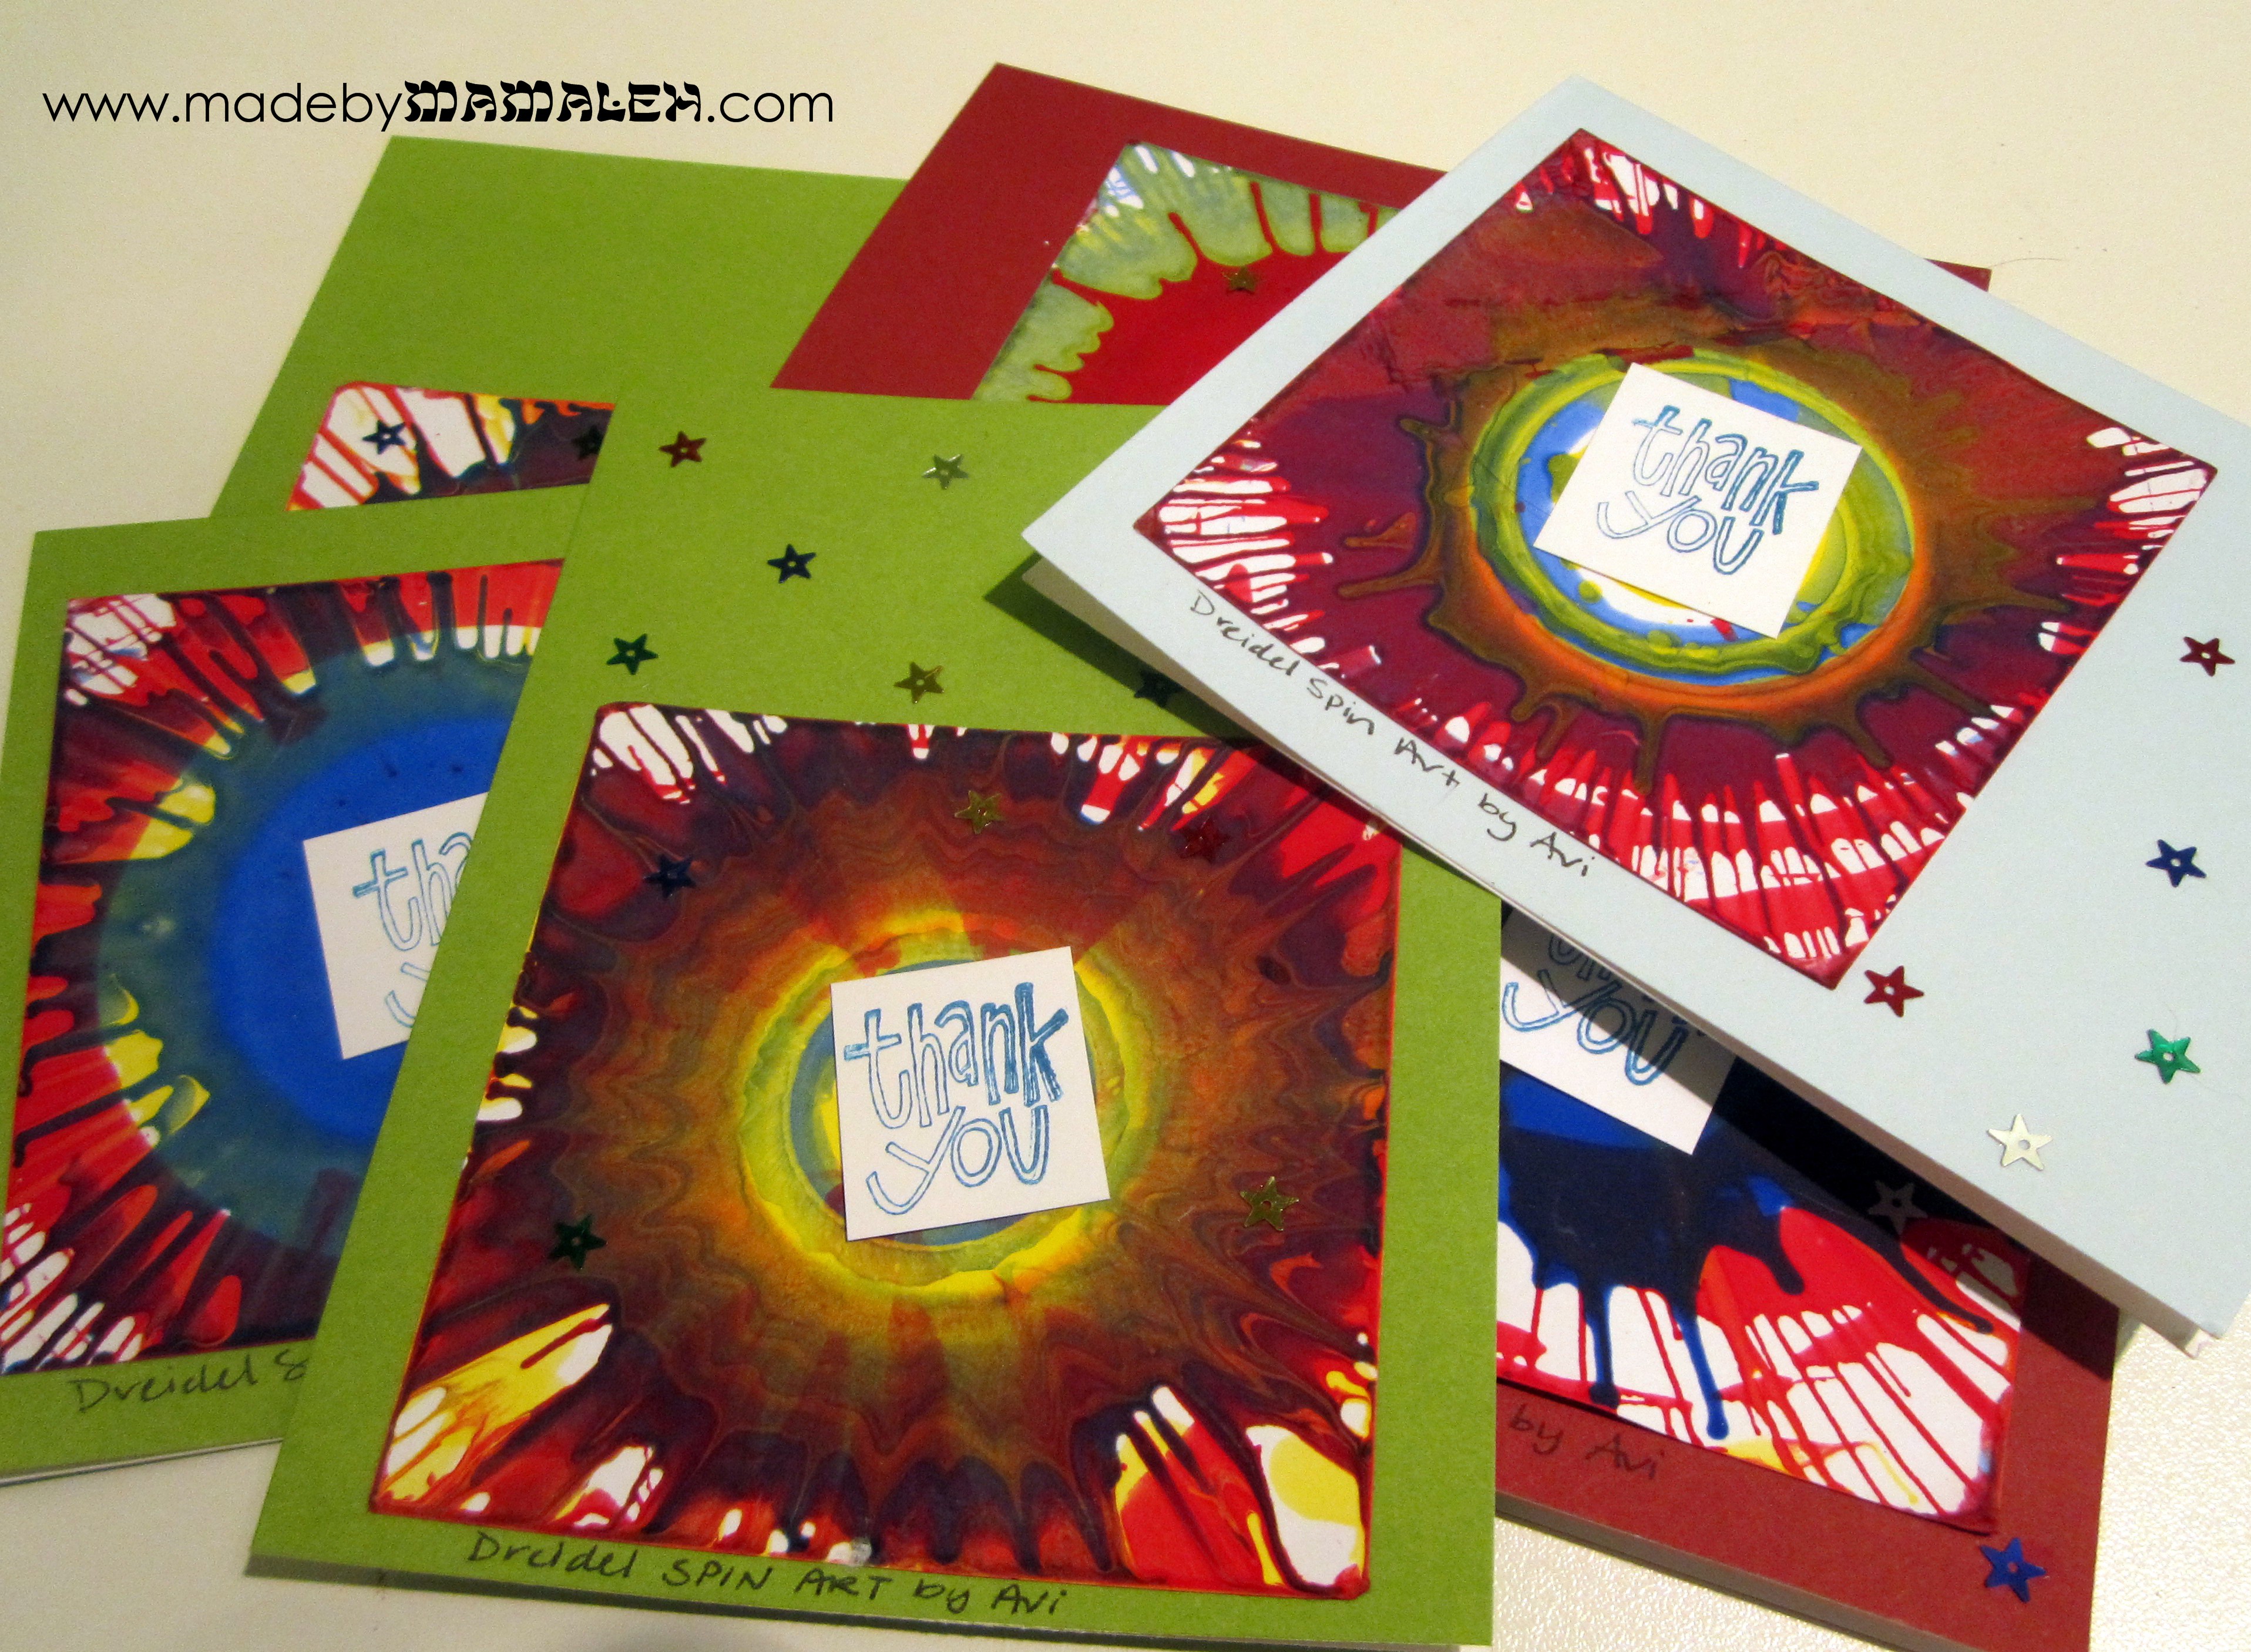
Ack! Where has the time gone? It’s already January 13th and we still haven’t finished our holiday thank yous (and Hanukkah was so early, it’s even worse)! Oh well, I figure as long as they get ’em before Valentine’s Day, we’re in good shape and better late than never, right? I was taught from a young age the importance of writing a nice note of thanks for a gift and I am trying to install the same in my son, Avi, even at age 3 1/2. One thing that I think helps make the process a bit more fun is to make the cards yourselves. If you recall, we had a lot of fun doing the dreidel spin art from our Hanukkah Kiwi Crate back in December. I saved all of those little paintings thinking they’d come in handy for something like thank you notes and sure enough they did.
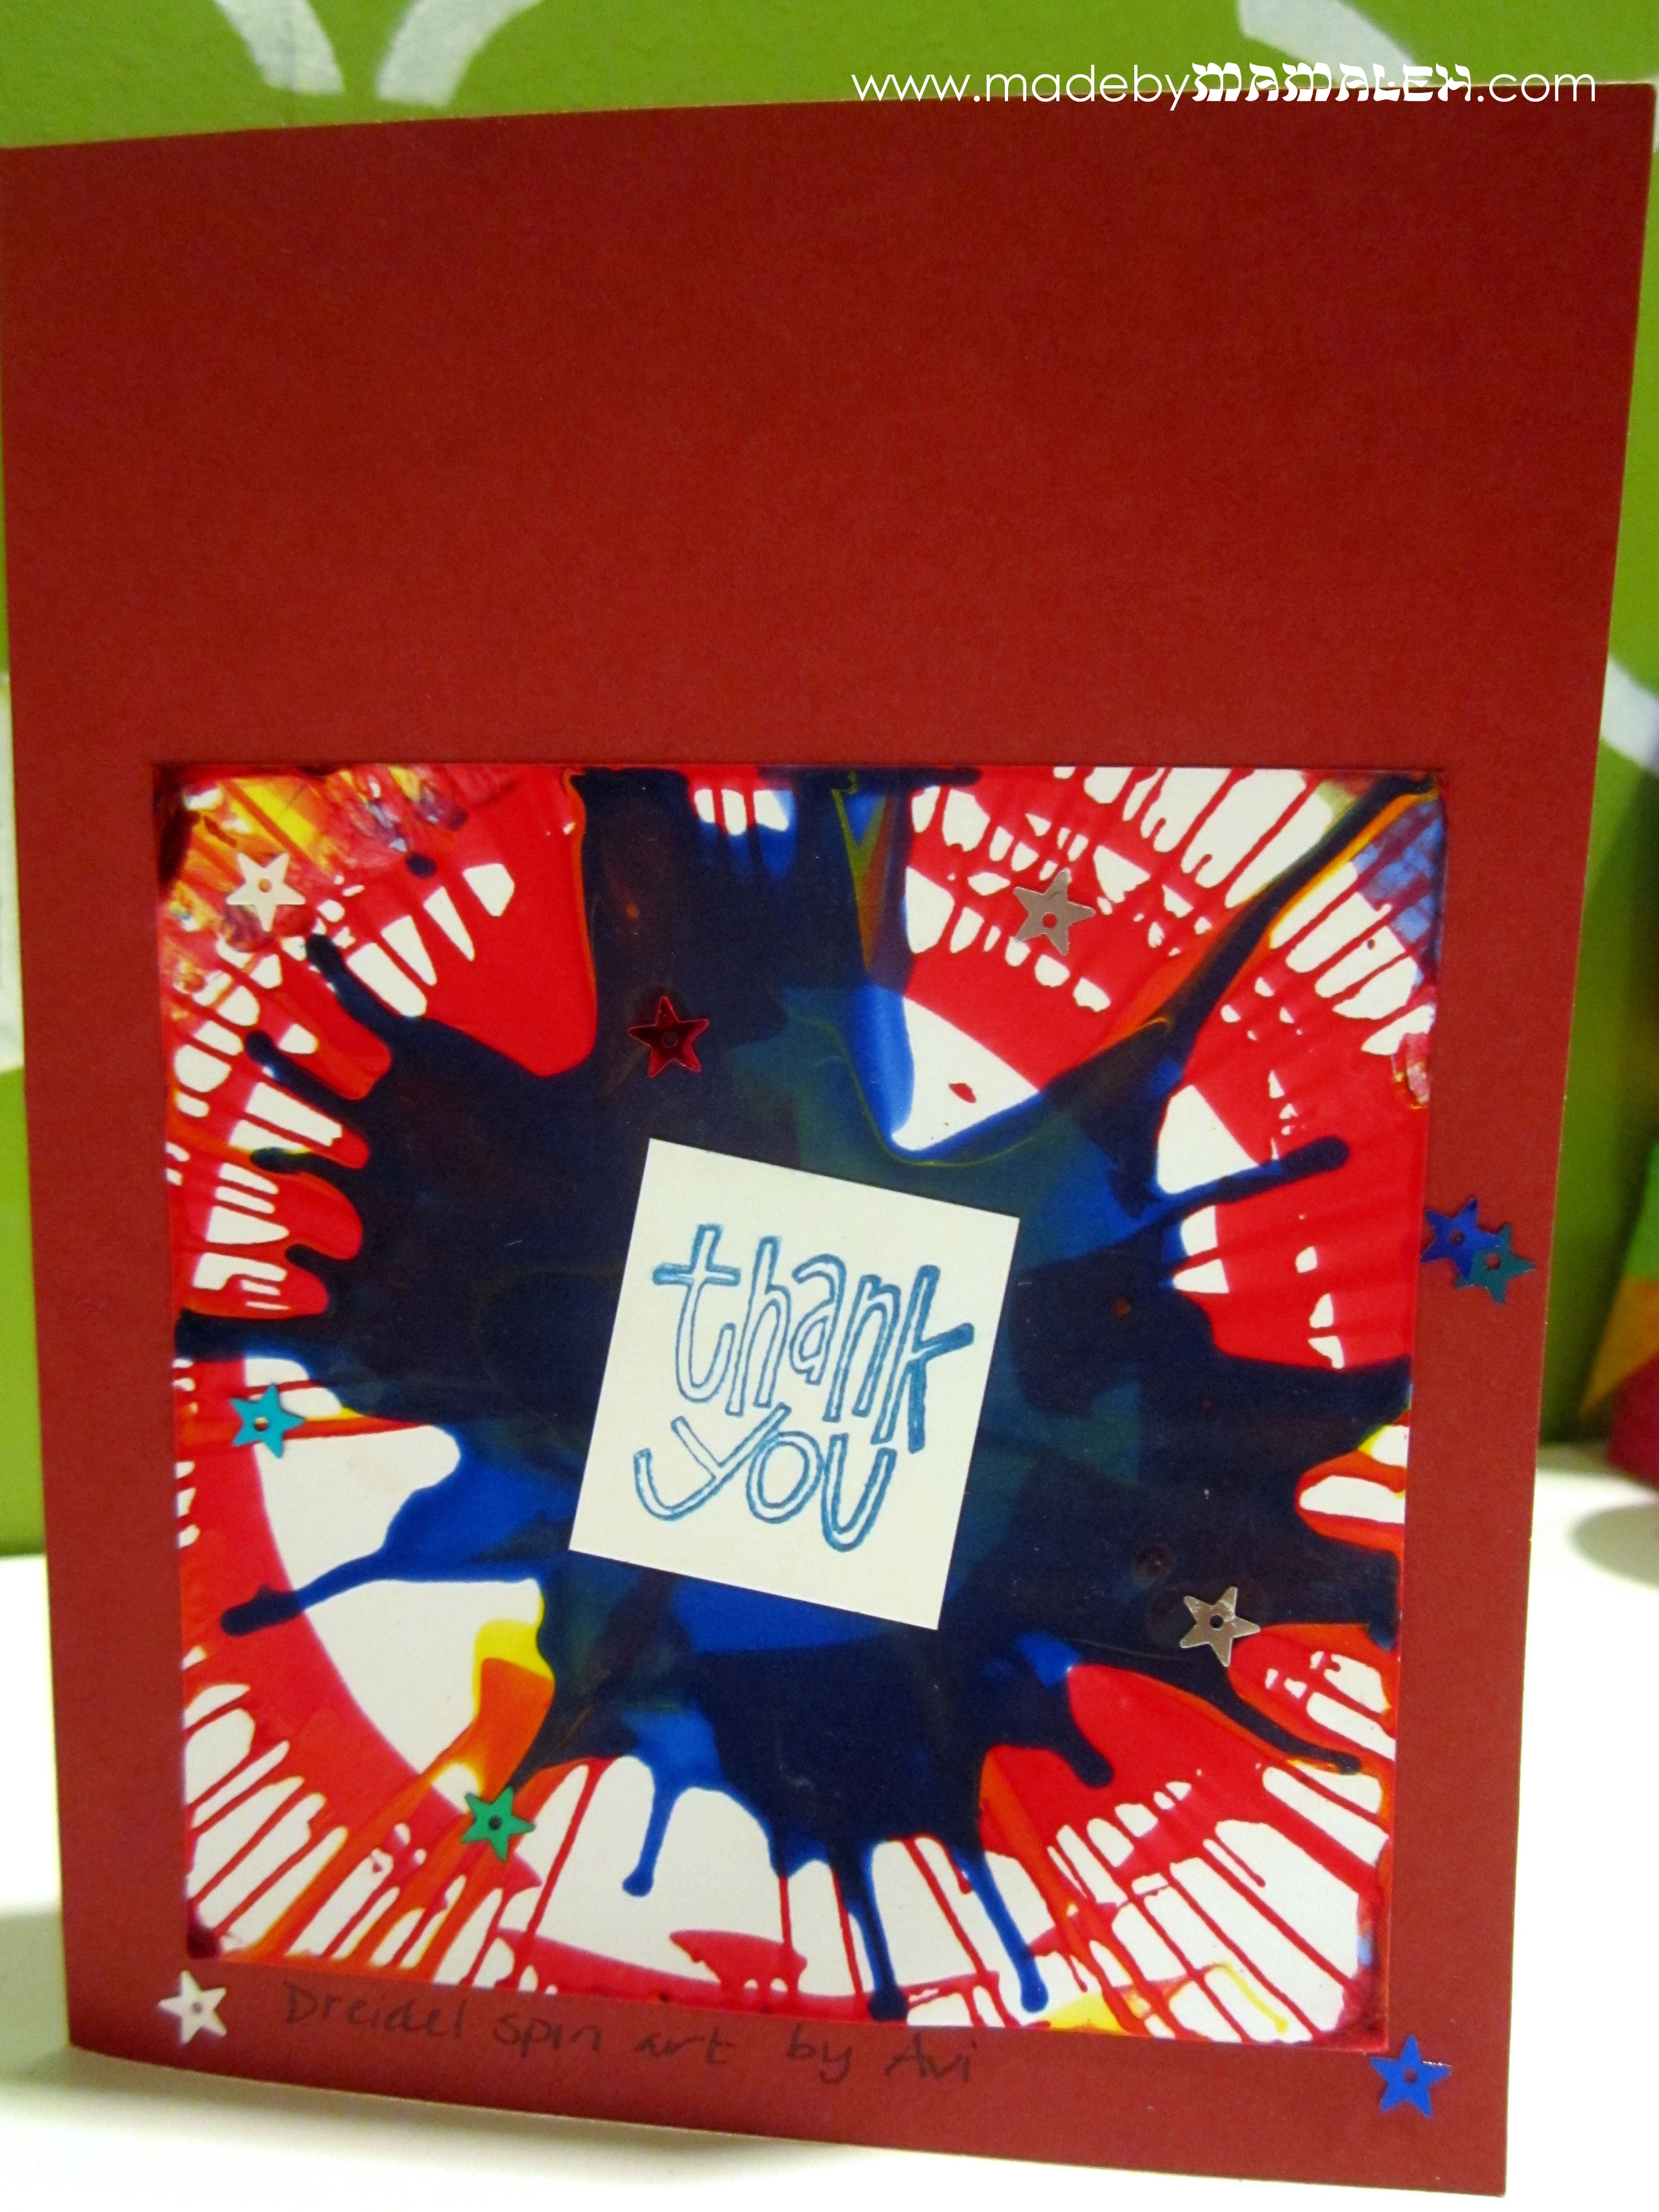

The process was simple and kid-friendly. Starting with some nice colored A2 notecards from Memory Box (I get all mine at Impress in Seattle), Avi and I used a glue stick to glue down the paintings. After gluing them we put them under a stack of books to help them lay flat. Meanwhile we stamped “thank you” on some scrap white cardstock in turquoise and trimmed it up into cute little squares -I realized just how great my mini guillotine paper cutter is for little hands (with adult help of course!) Then we attached these using my favorite adhesive and finished off the look with some scattered star sequins glued on. And to explain the art like any good artist’s print, I put a little handwritten “Dreidel Spin Art by Avi” under each of the paintings. Absolutely perfect kid thank yous!

Share this:

The last lights of Hanukkah 2012
As Hanukkah 2012 draws to a close, I want to share one final Hanukkah project with you. As you are probably painfully aware, finding a Christmas T-shirt or pajamas (or anything) for kids is so easy but Hanukkah-wise, you’ll be lucky to find anything. Last year, I lucked out and found a “Dreidel Champion” T-shirt by Carter’s. This year, armed with my trusty Silhouette, I decided to make my own using simple Ts from Old Navy and a variety of vinyl.
First up is my own version of the “Dreidel Champion” for a friend’s son:

Now, love or hate the whole princess thing, we all know it’s popular with preschool girls. So, I decided why not embrace it and give it a new twist by creating a Dreidel Princess! For this shirt I used a combo of plain, glitter and flocked heat transfer vinyl as well as rhinestones of course. Next year I may need an adult version…

I had bought some purple foil star of david ribbon on one of my 1-800-Dreidel shopping trips and couldn’t resist the chance to use it for a matching bow. A little hot glue and a pony tail holder and I was in business.

Finally, for my own mini-mensch, I’d planned to do a collage of numbers since counting is rather popular in our house at the moment but he informed me that he wanted a menorah so a menorah he got. Using gold glitter vinyl and several shades of blue in plain and flocked, I created this “8 Crazy Nights” shirt.

He absolutely loved it (he wore it more than once!). I just can’t resist the chance to show off his Hanukkah (and all around) cuteness. Hope your Hanukkah was as full of sheer joy as mine!

As Hanukkah reminds us of the miracle of light, there are so many positive ways that we can channel our collective feelings of sorrow surrounding the Newtown tragedy. My heart aches for the families and I wanted to share one outlet that speaks to my creative side. One of my favorite crafty blogs, Damask Love has created a very special project to inspire healing through creativity. Check it out if you are looking for a non-traditional way to help.


